If you work with electronics or DIY projects, knowing how to test a DC motor with a multimeter is a skill you can’t afford to miss. Imagine being able to quickly find out if your motor is working or if it needs fixing—saving you time, money, and frustration.
In this guide, you’ll learn simple, step-by-step methods to check your motor’s health using just a multimeter. Whether you’re a beginner or have some experience, this article will give you clear, practical tips that make testing easy and reliable. Ready to take control of your motor troubleshooting?
Let’s dive in.

Credit: electronics.stackexchange.com
Tools Needed
Testing a DC motor with a multimeter requires some basic tools. These tools help you check the motor’s condition safely and accurately. Having the right tools makes the process easier and faster. Here are the essential tools needed for this task.
Multimeter
A multimeter is the main tool for testing a DC motor. It measures voltage, current, and resistance. Use a digital multimeter for clear and easy readings. Make sure it can test low voltage DC circuits.
Insulated Screwdrivers
Insulated screwdrivers help you open the motor casing safely. They protect you from electric shocks. Choose screwdrivers with comfortable grips and various sizes.
Alligator Clip Test Leads
Alligator clip test leads make connections easier. They hold wires securely during testing. This frees your hands and improves safety.
Safety Gloves
Safety gloves protect your hands from sharp edges and electric shocks. Use gloves with good grip and insulation. They add a layer of safety while working with motors.
Cleaning Cloth
A cleaning cloth helps remove dust and dirt from the motor. Clean contacts ensure better test results. Use a dry, lint-free cloth for best results.
Preparing The Motor
Start by disconnecting the motor from any power source. Clean the motor terminals to ensure accurate testing. Check for visible damage or wear before using the multimeter.
Disconnect Power
Always start by disconnecting the motor from its power source. This step ensures safety and prevents electric shock. Make sure the motor is completely off and unplugged. Double-check the wires to confirm no current flows. Testing a live motor can damage your multimeter or cause injury.
Visual Inspection
Look over the motor carefully before testing. Check for visible signs of damage like burnt wires or loose connections. Examine the motor casing for cracks or corrosion. Clean dirt or dust from the motor surface. A clean motor is easier to test and gives more accurate results.
Setting The Multimeter
Setting your multimeter correctly is the first step to test a DC motor accurately. This process ensures you get reliable readings and avoid damage to the multimeter or motor. Understanding how to set the multimeter prepares you for the next steps in testing.
Select Resistance Mode
Turn the multimeter dial to the resistance mode, often marked with the Greek letter omega (Ω). This mode measures the resistance inside the motor coil. Low resistance shows the coil is in good condition, while high or infinite resistance may indicate a broken coil or wiring issue. Make sure the probes are connected properly before taking any measurement.
Check Multimeter Calibration
Before testing the motor, verify the multimeter’s calibration. Touch the two probes together and observe the reading. It should show zero or near zero resistance. If the reading is off, adjust the multimeter as per the device manual. Proper calibration ensures your readings are accurate and trustworthy.
Testing Motor Windings
Testing motor windings is a key step in checking a DC motor’s health. Windings are the coils of wire inside the motor. They create magnetic fields that help the motor spin.
Testing these windings with a multimeter helps find problems like breaks or shorts. Good windings have a certain resistance range. Damaged windings will show unusual readings. This section explains how to measure coil resistance and spot open or short circuits.
Measure Coil Resistance
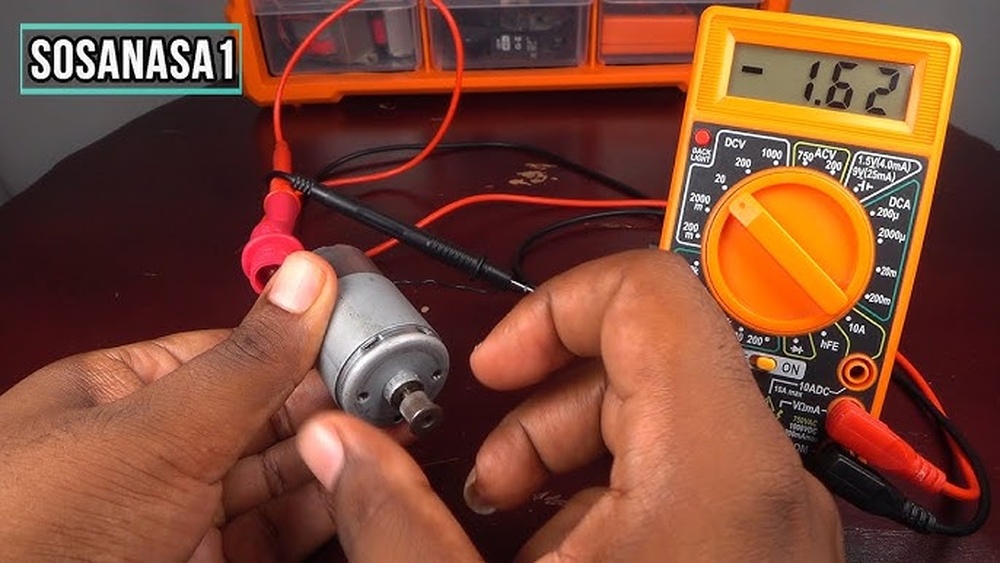
Set your multimeter to the ohms (Ω) setting. Touch the probes to the winding terminals. The meter will show the coil’s resistance.
Compare this reading to the motor’s specifications. Resistance too high or too low means the winding is faulty. A normal reading means the coil is likely fine.
Identify Open Or Short Circuits
An open circuit means the winding wire is broken. The multimeter will show infinite resistance or no reading. This means no current can flow through the coil.
A short circuit means the wire touches itself or the motor frame. This causes very low resistance. Check each winding for low or zero resistance to find shorts.
Checking Continuity
Checking continuity in a DC motor helps find breaks or faults in the motor windings. Continuity means electricity can flow through the motor parts without interruption. Using a multimeter to test continuity shows if the motor wires and components are connected properly.
This step is important before running the motor. It prevents damage and ensures the motor works well.
Test Connections
Set the multimeter to the continuity mode or the lowest resistance setting. Touch the probes to the motor terminals. A beep or a low reading means the circuit is complete. No sound or a very high reading shows a break in the circuit. Check all terminals and wires connected to the motor. Replace or repair any damaged wires.
Inspect Brushes And Commutator
Brushes and commutators are key parts for current flow inside the motor. Remove the brushes carefully. Look for wear or dirt on the brushes. Clean or replace brushes if needed. Check the commutator for dirt, damage, or uneven surfaces. Use fine sandpaper to clean the commutator gently. Good contact here ensures smooth current flow and motor function.

Credit: www.wikihow.com
Testing For Ground Faults
Testing for ground faults is an important step in checking a DC motor’s health. Ground faults happen when the motor winding touches the motor frame or ground. This causes current to flow where it should not. It can lead to motor damage or failure. Detecting ground faults early saves time and money. A multimeter helps find these faults quickly and safely.
Check Motor Frame
Start by turning off the motor and disconnecting it from power. Set your multimeter to the resistance or ohms mode. Touch one probe to the motor frame, which is usually metal. Touch the other probe to each motor terminal one by one. A very low resistance reading means there is a ground fault. The winding may be touching the frame. If the reading shows open or very high resistance, there is no ground fault.
Use Insulation Resistance Test
This test checks the insulation between motor windings and the frame. Use a megohmmeter or insulation tester for this step. Connect one lead to the motor terminal and the other to the motor frame. Press the test button to apply a high voltage. The meter shows insulation resistance in megaohms. A high value means good insulation and no ground fault. A low value points to damaged insulation or a ground fault. Repeat for each motor terminal.
Interpreting Results
Interpreting the results of your DC motor test is key to understanding its condition. The multimeter readings tell you if the motor windings are healthy or damaged. You will see numbers that represent resistance values. These numbers help you decide if the motor works well or needs repair.
Normal Resistance Values
Each DC motor has specific resistance values for its windings. Normally, the resistance is low but not zero. A typical reading ranges from 1 ohm to 100 ohms. This depends on the motor size and type. Consistent readings on all windings show the motor is in good shape. Small differences between windings are normal.
Signs Of Faulty Motor
High or infinite resistance means a broken winding or open circuit. This is a clear sign the motor is faulty. Very low or zero resistance suggests a short circuit inside the motor. This causes the motor to overheat or fail. Unequal resistance between windings can cause uneven motor performance. Strange readings on the multimeter often mean the motor needs service or replacement.

Credit: www.youtube.com
Additional Tips
Testing a DC motor with a multimeter involves more than just measuring voltage or resistance. These additional tips help ensure accurate results and protect your motor and yourself. Follow these simple guidelines for a smoother testing process.
Safety Precautions
Always disconnect the motor from power before testing. This prevents electric shock and damage to your multimeter. Use insulated tools to avoid accidental contact with live wires. Work in a dry area to reduce the risk of short circuits. Wear safety goggles to protect your eyes from sparks. Never touch the motor terminals with wet hands. Check your multimeter’s settings before starting. Set it to the correct measurement type and range. Keep children and pets away while testing. Safety comes first to avoid injuries or equipment damage.
When To Replace The Motor
Look for burning smells or unusual noises during testing. These signs show internal damage or worn parts. If the resistance readings are very high or zero, the motor windings might be broken. Motors that fail to start or run erratically need replacement. Excessive vibration or overheating also signals a problem. Repair costs sometimes exceed buying a new motor. Choose replacement if performance drops or repairs are frequent. A fresh motor ensures better efficiency and reliability for your projects.
Frequently Asked Questions
How Do I Check A Dc Motor’s Resistance With A Multimeter?
To check resistance, set the multimeter to the ohms setting. Touch the probes to the motor terminals. A low, stable reading indicates good winding condition.
Can A Multimeter Detect A Faulty Dc Motor?
Yes, a multimeter can detect faults like open circuits or shorted windings by measuring resistance and continuity in the motor.
What Multimeter Setting Is Best For Testing A Dc Motor?
Use the resistance (ohms) and continuity settings to test windings and connections. Voltage measurement can check power supply to the motor.
How To Test Dc Motor Continuity With A Multimeter?
Set the multimeter to continuity mode. Place probes on motor terminals. A beep or low reading confirms proper continuity in the motor windings.
Conclusion
Testing a DC motor with a multimeter is simple and useful. You can check if the motor works well or needs fixing. Just follow the steps carefully and use the right settings on your multimeter. This test saves time and money by finding problems early.
Keep your motor in good shape by testing it regularly. Now, you can feel confident handling basic motor checks at home or work. Practice a few times, and it will become easier. Ready to give it a try?

I’m Asif Ur Rahman Adib, an Electrical Engineer and lecturer. My journey began in the lab, watching students struggle with instruments they used every day without fully understanding them. Over time, I’ve combined teaching, research, and hands-on experience to help others grasp electrical concepts clearly, safely, and practically—whether it’s understanding a circuit or mastering a multimeter.