If your motor isn’t running smoothly or won’t start at all, the capacitor might be the problem. But how can you be sure?
Testing a motor capacitor with a multimeter is easier than you think, and it could save you time and money. In this guide, you’ll learn simple steps to check your capacitor’s health quickly and safely. Keep reading, and you’ll gain the confidence to troubleshoot like a pro and get your motor back in action fast.
Tools Needed
Testing a motor capacitor requires the right tools. Having the proper equipment ensures accurate results and keeps you safe. Below are the essential tools you need before starting the test.
Choosing The Right Multimeter
Select a multimeter that can measure capacitance. Not all multimeters have this function. A digital multimeter with a capacitance setting works best. Check the multimeter’s range to cover the capacitor’s value. Choose one with clear displays and easy controls. This helps avoid mistakes during testing.
Safety Gear And Precautions
Wear safety glasses to protect your eyes from sparks or debris. Use insulated gloves to avoid electric shock. Make sure the motor capacitor is fully discharged before testing. Use a screwdriver with an insulated handle to discharge it safely. Work in a dry area and keep your hands dry. Never test a live capacitor to prevent accidents.
Credit: support.clivecoffee.com
Preparing The Motor Capacitor
Preparing the motor capacitor is the first step in testing it with a multimeter. Safety and accuracy depend on proper preparation. Taking time to prepare helps avoid damage and injury. Follow each step carefully for the best results.
Disconnecting Power
Always turn off the power before working on any motor. Locate the circuit breaker or unplug the device. Double-check that no electricity flows to the motor. This step prevents electric shock and equipment damage.
Locating The Capacitor
Find the capacitor inside the motor or near it. It usually looks like a small cylinder or oval shape. Check the motor’s manual if unsure. The capacitor has two or three terminals for wires.
Discharging The Capacitor Safely
Capacitors store electric charge even after power is off. Discharge the capacitor to avoid shocks. Use a screwdriver with an insulated handle. Touch the terminals to release stored energy. Repeat a few times for safety.
Setting Up The Multimeter
Setting up the multimeter correctly is the first step in testing a motor capacitor. This process ensures accurate readings and helps avoid damage to the device or capacitor. Take time to prepare the multimeter before connecting it to the capacitor. Understanding the right mode to use on your multimeter is crucial for a successful test.
Selecting The Capacitance Mode
Most modern multimeters have a capacitance mode designed to measure capacitor values directly. Turn the dial to the capacitance symbol, often labeled as “CAP” or a small capacitor icon. This mode shows the capacitor’s microfarad (µF) rating, helping confirm if it matches the motor capacitor’s specifications. Ensure the capacitor is fully discharged before testing to avoid damaging the multimeter or getting false readings.
Using Ohmmeter Mode For Basic Checks
If your multimeter lacks capacitance mode, use the ohmmeter mode as a simple check. Set the dial to the resistance symbol, usually marked as “Ω.” Connect the probes to the capacitor terminals. The reading should start low and then slowly rise toward infinity. This behavior indicates the capacitor is charging and likely working. A steady low or zero reading suggests a shorted capacitor, while no change means it may be open or faulty.
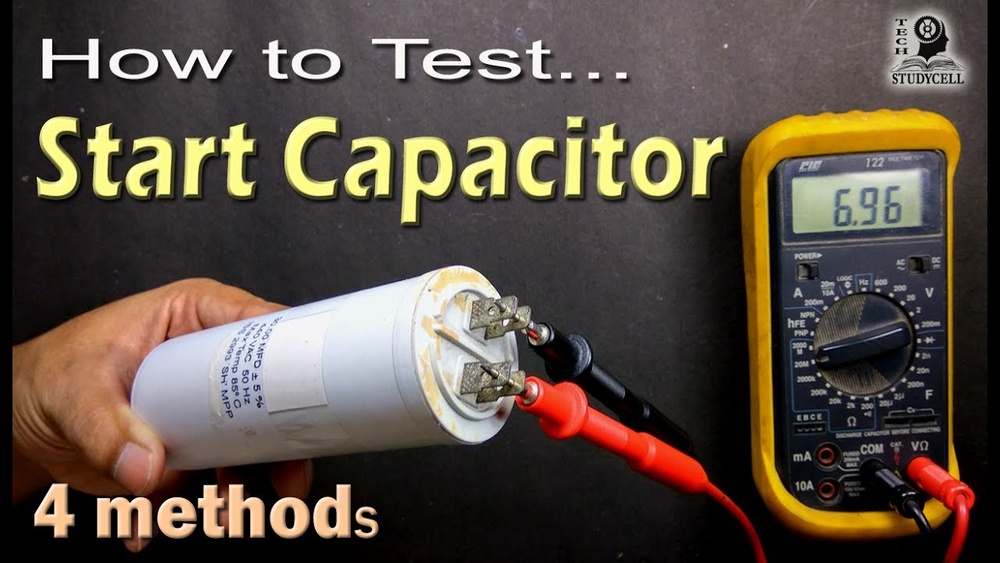
Testing The Capacitor
Testing the capacitor is a key step in motor maintenance. It helps find out if the capacitor works well or needs replacing. A multimeter is the best tool for this job. It checks different capacitor functions quickly and safely.
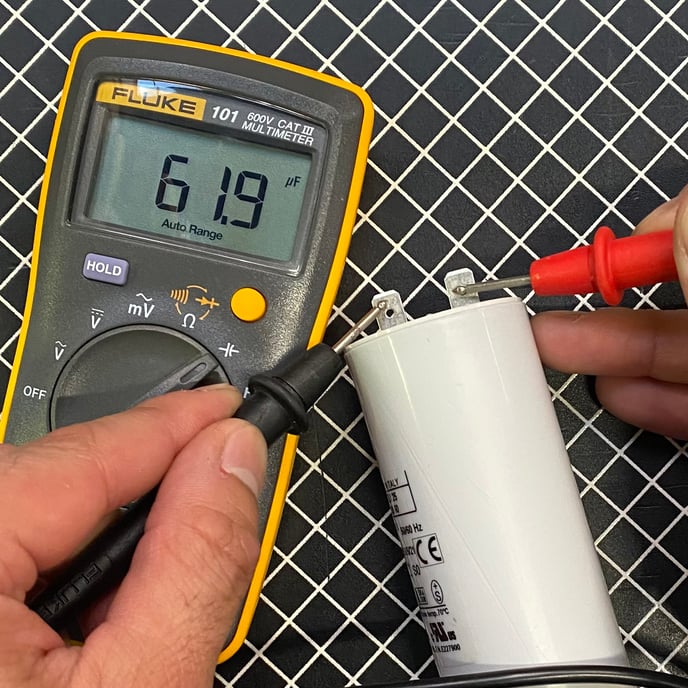
Measuring Capacitance Value
Set your multimeter to the capacitance mode. Connect the meter leads to the capacitor terminals. Read the value shown on the display. Compare this number to the capacitor’s rated value. A big difference means the capacitor may be bad.
Interpreting Multimeter Readings
Check if the reading is close to the capacitor’s label. Slight variations are normal. Large gaps or no reading suggest a problem. A zero or very low reading means no capacitance. A very high or infinite reading means the capacitor is faulty.
Checking For Short Or Open Circuits
Switch the multimeter to the resistance or continuity mode. Connect the leads to the capacitor terminals again. A short circuit shows near zero resistance. An open circuit shows infinite resistance. Both conditions mean the capacitor is damaged and should be replaced.
Troubleshooting Common Issues
Troubleshooting common issues with motor capacitors is key to keeping your motor running well. Testing with a multimeter helps find problems fast. Sometimes the test shows the capacitor is not working right. Knowing what to do next saves time and money.
Problems can cause the motor to run slow, fail to start, or make strange noises. A bad capacitor often causes these issues. The next steps depend on the test results and the condition of the capacitor.
What To Do If The Capacitor Fails The Test
First, confirm the multimeter reading is correct. Check the meter settings and connections. Test the capacitor again to be sure. A failed test usually means the capacitor is weak or broken.
Do not try to fix the capacitor yourself. Capacitors hold electric charge and can be dangerous. Safely discharge the capacitor before handling it. Then remove it from the motor for replacement or repair.
Look for signs of damage like bulging or leaking. These signs confirm the capacitor is bad. Replace the capacitor with the same type and rating for safety and performance.
When To Replace The Capacitor
Replace the capacitor if it fails the test or shows physical damage. Also replace if the motor has starting problems or runs irregularly. Old capacitors lose capacity over time and need replacement.
Keep a record of how long the capacitor has been in use. Most capacitors last 5 to 10 years. If close to this time, replacement prevents sudden motor failure.
Using the correct replacement capacitor improves motor life. Always choose high-quality parts. Proper maintenance and timely replacement keep motors running smoothly.

Credit: www.wikihow.com
Tips For Accurate Testing
Testing a motor capacitor with a multimeter requires care and precision. Accurate results depend on how you prepare and use your tools. Following simple tips can help avoid errors and give reliable readings. This section shares key advice for clear and correct testing.
Avoiding Common Mistakes
Always disconnect power before testing. This prevents shock and damage to the multimeter.
Discharge the capacitor fully by shorting its terminals with a screwdriver. This stops false readings.
Set the multimeter to the correct mode, usually the capacitance or resistance setting. Wrong settings cause wrong results.
Hold the probes steady and avoid touching the metal parts. Body electricity can affect the reading.
Test capacitors at room temperature. Extreme heat or cold changes their values.
Maintaining Your Multimeter
Check multimeter batteries often. Low power can lead to weak signals and errors.
Clean the probes and meter contacts regularly. Dirt blocks proper connection.
Store the multimeter in a dry, dust-free place to extend its life.
Inspect the test leads for cracks or breaks. Damaged leads cause unreliable results.
Calibrate your multimeter periodically according to the manufacturer’s instructions. This keeps accuracy high.
Credit: www.mingledorffs.com
Frequently Asked Questions
How Do I Test A Motor Capacitor With A Multimeter?
To test, first discharge the capacitor safely. Set the multimeter to capacitance mode, connect probes to terminals, and read the value. Compare it with the capacitor’s rated value to check if it’s within tolerance.
What Multimeter Setting Is Best For Capacitor Testing?
Use the capacitance measurement setting on your multimeter. If unavailable, use the ohmmeter mode to check resistance changes, indicating capacitor health. Always ensure the capacitor is fully discharged before testing.
Can A Multimeter Detect A Faulty Motor Capacitor?
Yes, a multimeter can detect faults by measuring capacitance and resistance. Low or no capacitance and infinite or zero resistance indicate a faulty capacitor needing replacement.
Why Is Capacitor Discharge Necessary Before Testing?
Discharging prevents electric shock and protects the multimeter from damage. It ensures accurate readings by removing stored electrical charge inside the capacitor before measurement.
Conclusion
Testing a motor capacitor with a multimeter is simple and quick. Just follow the steps carefully and stay safe. A good capacitor helps your motor run well and saves energy. Regular checks can prevent bigger problems later. Keep your tools ready and test often.
This way, you protect your motor and avoid costly repairs. Practice these easy steps to keep things working smoothly.

I’m Asif Ur Rahman Adib, an Electrical Engineer and lecturer. My journey began in the lab, watching students struggle with instruments they used every day without fully understanding them. Over time, I’ve combined teaching, research, and hands-on experience to help others grasp electrical concepts clearly, safely, and practically—whether it’s understanding a circuit or mastering a multimeter.