Are you facing issues with your solenoid valve and unsure if it’s working properly? Testing it yourself doesn’t have to be complicated.
With just a multimeter and a few simple steps, you can quickly find out if your solenoid valve is functioning or needs replacement. Keep reading, and you’ll learn an easy, foolproof way to test your solenoid valve—saving you time, money, and frustration.
Ready to become your own troubleshooting expert? Let’s dive in!

Credit: www.youtube.com
Solenoid Valve Basics
Understanding solenoid valves is key to testing them correctly. These valves control the flow of liquids or gases using an electric coil. They open or close when electricity passes through the coil. This action makes solenoid valves very useful in many machines and systems.
Knowing the basics helps you check if a solenoid valve works well. You will learn what it is and where it is used. This knowledge makes testing easier and more accurate.
What Is A Solenoid Valve
A solenoid valve is an electromechanical device. It uses an electric current to create a magnetic field. This magnetic field moves a plunger inside the valve. The plunger opens or closes the valve to control fluid flow. It works fast and without manual effort. Solenoid valves come in different sizes and types. They can handle liquids, gases, or steam.
Common Applications
Solenoid valves appear in many daily systems. They control water flow in irrigation and washing machines. They manage air in HVAC and pneumatic systems. In cars, they regulate fuel and emissions. Factories use them in automation and safety devices. Their quick response helps machines work smoothly and safely.
Tools Needed
Testing a solenoid valve with a multimeter requires a few specific tools. Having the right tools makes the process easier and more accurate. This section explains what tools you need before starting the test.
Choosing The Right Multimeter
Select a multimeter that measures resistance or continuity. Digital multimeters are easier to read and more precise. Check the multimeter’s battery to ensure it works well. The probes should be in good condition, without any damage.
Additional Equipment
You may need insulated gloves for safety. A small screwdriver helps to access the valve terminals. Keep a clean cloth nearby to wipe any dirt or dust. A notebook and pen can help record your readings for reference.
Safety Precautions
Testing a solenoid valve with a multimeter requires care. Safety is the top priority. Follow basic safety steps to avoid injury or damage.
Power Off And Isolation
Always turn off the power before testing. Disconnect the solenoid valve from any power source. This stops electric shock risks. Use a lockout or tagout system if possible. Isolate the valve from the circuit. This prevents accidental power flow during testing.
Protective Gear
Wear safety gloves to protect your hands. Use insulated gloves if available. Eye protection is essential to guard against sparks or debris. Avoid loose clothing or jewelry that can get caught. Proper gear keeps you safe during electrical work.
Preparing The Valve
Preparing the solenoid valve is the first step before testing it with a multimeter. This process ensures safety and accuracy during the test. Proper preparation helps avoid errors and damage to the valve or multimeter.
It involves two main tasks: locating the valve and disconnecting its wiring. Both steps require care and attention to detail. Follow these instructions to prepare the valve correctly.
Locating The Valve
The solenoid valve is usually near the equipment it controls. Look around pipes, air compressors, or water systems. The valve often has a coil with wires connected to it.
Check the equipment manual if you cannot find the valve. Identify the valve by its shape and the wires attached to it. Make sure you know which valve needs testing.
Disconnecting Wiring
Turn off power before touching any wires. This step is important for safety. Find the wires connected to the valve coil.
Carefully disconnect these wires from the valve terminals. Use tools if needed, but do not pull wires forcefully. Keep track of where each wire was connected for reassembly.
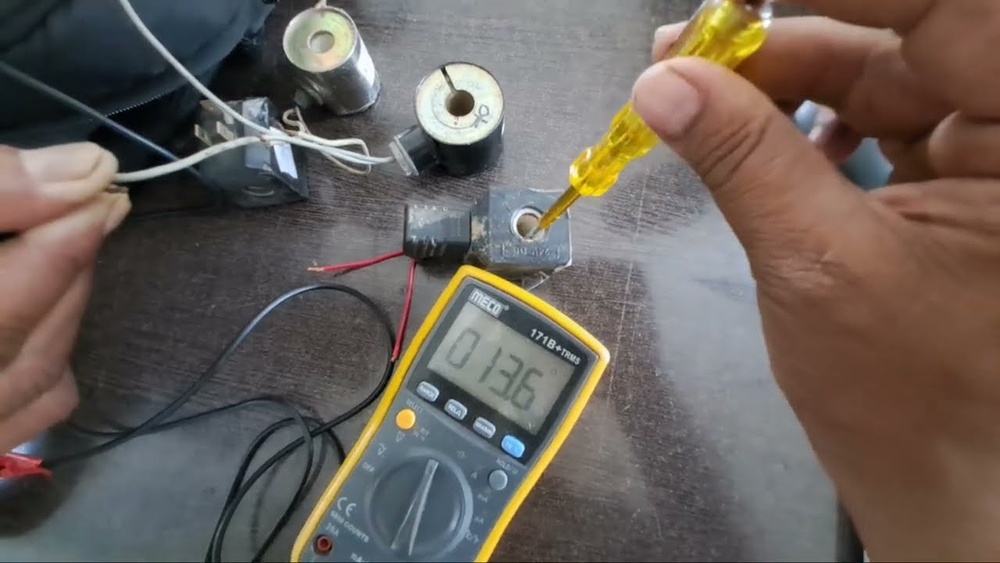
Resistance Testing
Resistance testing is an easy way to check a solenoid valve’s coil. It helps find out if the coil is working well or if it has a problem. A multimeter measures the coil’s resistance, which tells you about the coil’s condition. This test is important before replacing or repairing the valve.
Setting Multimeter To Ohms
Turn on the multimeter. Set it to the ohms (Ω) mode. This mode measures resistance. Choose a range if your multimeter is not auto-ranging. A low range like 200 ohms is best for solenoid coils. Make sure the probes are connected correctly. The black probe goes to the common (COM) port. The red probe goes to the port labeled for resistance.
Measuring Coil Resistance
Locate the solenoid coil terminals. Place one probe on each terminal. Hold the probes steady. Read the resistance value on the multimeter screen. Avoid touching the metal parts with your fingers. This can affect the reading. Take note of the resistance value shown.
Interpreting Results
Check the coil resistance against the valve’s manual or datasheet. A normal coil usually has resistance between 20 to 60 ohms. If the reading is very low, near zero, the coil may be shorted. If it shows infinite or no reading, the coil might be open or broken. A correct resistance means the coil is likely good. Use these results to decide the next steps.
Continuity Testing
Continuity testing is a simple way to check if your solenoid valve’s coil is working properly. It helps find breaks or faults in the coil wiring. Using a multimeter for continuity testing can save time and prevent bigger problems.
This test shows if electrical current can pass through the coil. If current flows, the coil is likely intact. If not, the coil may be damaged or broken. Continuity testing is the first step in diagnosing solenoid valve issues.
Checking For Open Circuits
Set your multimeter to the continuity or resistance mode. Touch the meter probes to the two terminals on the solenoid coil. A beep or low resistance reading means the circuit is closed and continuous.
No beep or infinite resistance means an open circuit. An open circuit means the coil wire is broken somewhere. This break stops electricity from flowing through the coil. The solenoid valve will not work with an open coil circuit.
Confirming Coil Integrity
After checking for open circuits, examine the resistance value. Compare this value with the coil’s specification in the manual. A very high or very low reading shows coil damage or a short circuit.
Normal resistance confirms the coil is intact and ready to operate. This step helps make sure the solenoid valve will function as expected. Testing coil integrity is key to effective solenoid valve maintenance.
Voltage Testing
Voltage testing is a key step in checking a solenoid valve. It helps confirm if the valve gets the right power. Without proper voltage, the valve may not work well or at all. Using a multimeter for this test is simple and fast. Follow these steps to measure voltage correctly and keep your solenoid valve running smoothly.
Setting Multimeter To Voltage
Turn on your multimeter first. Set it to measure voltage. Choose the right type: AC or DC, based on your valve’s power source. Usually, solenoid valves use DC voltage. Select a range higher than the expected voltage to avoid damage. This prepares the tool for accurate readings.
Measuring Supply Voltage
Find the valve’s power supply wires. Touch the multimeter probes to these wires carefully. The red probe goes to the positive wire. The black probe goes to the negative or ground wire. Hold the probes steady. Read the voltage value on the multimeter screen. This shows the current power supply to the valve.
Verifying Proper Voltage
Compare the measured voltage to the valve’s specifications. The correct voltage ensures the valve works properly. If the voltage is too low, the valve may fail to open or close. High voltage can damage the valve coil. Accurate voltage keeps the solenoid valve safe and functional.
Credit: support.weathermatic.com
Troubleshooting Tips
Troubleshooting solenoid valves can save time and money. Testing with a multimeter helps find common problems fast. Knowing what to check makes repair easier and avoids guesswork.
Below are key tips to spot issues and decide when a valve needs replacement.
Common Faults
One common fault is coil burnout. A multimeter shows this by reading infinite resistance. Another issue is a short circuit, which shows very low resistance.
Sometimes, the valve coil may have loose connections. This causes inconsistent readings on the multimeter. Dirt or debris can block the valve, stopping it from working properly.
Check if the valve plunger moves freely. A stuck plunger means the valve needs cleaning or repair.
When To Replace The Valve
Replace the valve if the coil shows no continuity. This means the coil is broken and cannot be fixed.
Also, replace the valve if it leaks or does not open and close correctly. Cleaning cannot fix these problems.
Valves with damaged parts or corrosion should be replaced. This ensures safe and reliable operation of your system.
Maintaining Solenoid Valves
Maintaining solenoid valves is key to keeping machines running smoothly. These valves control fluid flow and must work without faults. Proper care prevents breakdowns and extends valve life. Simple steps can help avoid costly repairs and downtime.
Regular Inspection
Check solenoid valves often for signs of wear or damage. Look for leaks, cracks, or unusual noises during operation. Inspect electrical connections to ensure they are tight and clean. Early detection of issues helps fix problems quickly. Use a multimeter to test coil resistance regularly. This step confirms if the coil is functioning well.
Cleaning And Lubrication
Keep solenoid valves clean from dirt and debris. Dirt can block valve movement and reduce efficiency. Use a soft brush or cloth to clean the valve surfaces gently. Avoid harsh chemicals that could damage parts. Lubricate moving parts with manufacturer-approved oil. Proper lubrication reduces friction and wear. This simple care keeps valves working smoothly and quietly.
Credit: support.weathermatic.com
Frequently Asked Questions
How Do I Test A Solenoid Valve With A Multimeter?
To test a solenoid valve, set your multimeter to the resistance (ohms) mode. Disconnect the valve’s power, then measure across the coil terminals. A normal reading usually ranges between 20 to 50 ohms. Infinite or zero resistance indicates a faulty coil.
What Resistance Value Indicates A Bad Solenoid Coil?
A bad solenoid coil shows infinite or zero resistance on the multimeter. Infinite resistance means the coil is open or broken. Zero resistance indicates a short circuit. Both conditions require coil replacement to ensure proper solenoid valve function.
Can A Multimeter Check If A Solenoid Valve Is Working?
A multimeter tests the coil’s electrical condition but not mechanical operation. Measuring coil resistance confirms if the coil is intact. However, it can’t verify valve movement or fluid flow. Use other tools or manual tests for full solenoid valve functionality checks.
Why Does My Solenoid Valve Show No Resistance On Multimeter?
No resistance means the coil has a short circuit, causing a direct electrical path. This condition damages the coil and stops the valve from working. Immediate coil replacement is necessary to restore valve performance and prevent further electrical issues.
Conclusion
Testing a solenoid valve with a multimeter is simple and useful. You can find out if the valve works well or needs fixing. Always check the resistance and continuity carefully. This helps avoid bigger problems later. With practice, testing becomes quick and easy.
Keep your tools ready and follow the steps clearly. Stay safe and take your time. This way, you keep machines running smoothly and save money on repairs. Try testing on different valves to build confidence. It’s a handy skill for anyone working with electrical parts.

I’m Asif Ur Rahman Adib, an Electrical Engineer and lecturer. My journey began in the lab, watching students struggle with instruments they used every day without fully understanding them. Over time, I’ve combined teaching, research, and hands-on experience to help others grasp electrical concepts clearly, safely, and practically—whether it’s understanding a circuit or mastering a multimeter.