Are you struggling to know if your PT100 sensor is working properly? Checking a PT100 with a multimeter might sound tricky, but it’s easier than you think.
In this guide, you’ll learn simple steps to test your PT100 quickly and accurately. By the end, you’ll be confident in diagnosing issues and ensuring your equipment runs smoothly. Ready to save time and avoid costly mistakes? Let’s dive in and get your PT100 checked the right way.

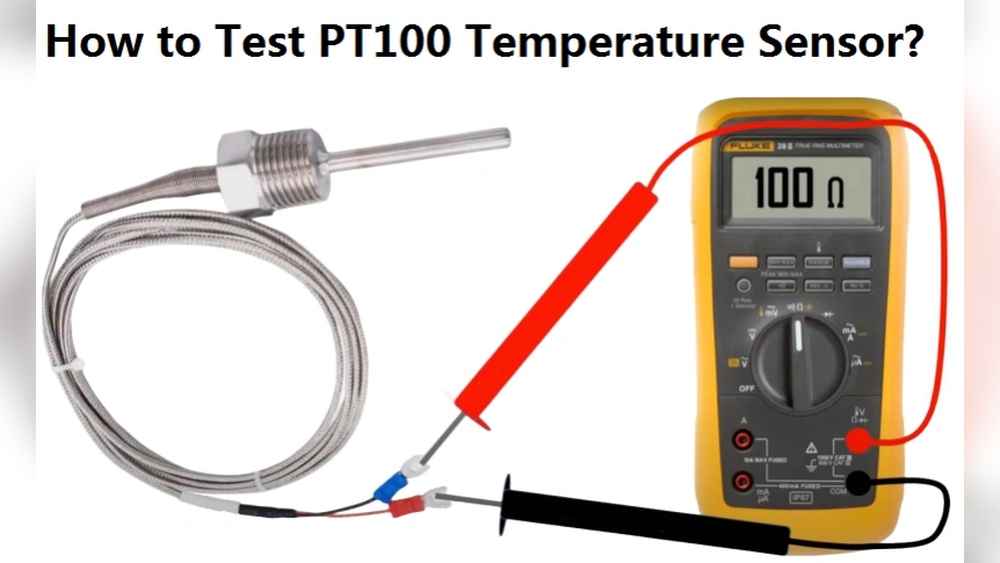
Credit: www.youtube.com
What Is A Pt100 Sensor
A Pt100 sensor is a type of temperature sensor used in many industries. It measures temperature by changing resistance as the temperature changes. This sensor is known for accuracy and stability over a wide temperature range.
The “Pt” in Pt100 means platinum, a metal that resists corrosion and has stable properties. The number “100” means the sensor has 100 ohms resistance at 0 degrees Celsius. The resistance rises with temperature, allowing precise measurement.
How A Pt100 Sensor Works
The Pt100 sensor works by measuring electrical resistance. Platinum’s resistance changes predictably with temperature. A small current flows through the sensor, and the resistance alters this current. This change helps determine the exact temperature.
Types Of Pt100 Sensors
Pt100 sensors come in different forms, like wire-wound and thin-film types. Wire-wound sensors use platinum wire wrapped around a core. Thin-film sensors have a platinum layer on a ceramic base. Each type suits different applications and budgets.
Common Uses Of Pt100 Sensors
Industries use Pt100 sensors for precise temperature control. They appear in HVAC systems, food processing, and laboratories. These sensors help maintain product quality and safety by monitoring temperature accurately.

Credit: www.processparameters.co.uk
Why Use A Multimeter For Pt100
Using a multimeter to check a Pt100 sensor is a simple and effective method. It helps find if the sensor works well or has problems. A multimeter measures resistance, which changes with temperature in a Pt100 sensor.
This test can save time and money by spotting issues early. It also avoids wrong readings that can affect machines or processes. The multimeter gives quick feedback on sensor health.
What Makes Multimeters Suitable For Pt100 Testing?
Multimeters measure resistance accurately and easily. Pt100 sensors change resistance depending on temperature. Multimeters detect these changes clearly.
They are easy to use and widely available. No special tools or training are needed. Anyone can quickly check a Pt100 sensor with a multimeter.
How Does Resistance Indicate Pt100 Condition?
Pt100 sensors have a known resistance at a specific temperature. For example, at 0°C, the resistance is 100 ohms. Any large difference shows the sensor may be faulty.
Measuring resistance helps find breaks or shorts in the sensor wire. It also checks if the sensor matches the expected values for certain temperatures.
Benefits Of Using A Multimeter For Pt100 Checks
Multimeters provide fast and reliable results. They help catch sensor problems before they cause bigger issues. Testing keeps equipment safe and working well.
They are cost-effective tools for routine checks. Multimeter tests do not harm the sensor or system. This makes them a practical choice for maintenance.
Required Tools And Safety Tips
Before checking a Pt100 sensor with a multimeter, gather the right tools and follow safety tips. Proper tools help get accurate results. Safety tips protect you from harm.
Required Tools
First, you need a digital multimeter. It should measure resistance accurately. Next, use insulated test leads for safety. A pair of small screwdrivers helps remove sensor covers. Keep a clean cloth to wipe contacts. A datasheet of the Pt100 sensor is useful too.
Safety Tips
Turn off all power before testing the sensor. Avoid touching live wires or terminals. Use insulated gloves if needed. Work in a dry place to avoid electric shocks. Keep the work area tidy and free of clutter. Check the multimeter’s battery and settings before use. Handle the sensor carefully to avoid damage.
Preparing The Pt100 Sensor
Start by turning off the power to the Pt100 sensor. Connect the multimeter probes to the sensor terminals and check for resistance. A proper reading shows if the sensor works or needs replacement.
Understanding The Pt100 Sensor
Preparing the Pt100 sensor starts with knowing what it is. It is a type of temperature sensor made from platinum. The sensor changes resistance when temperature changes. This change helps measure temperature accurately. Knowing this helps you handle the sensor carefully.
Gathering Necessary Tools
Before testing, collect all tools. You need a digital multimeter, wire cutters, and a clean cloth. The multimeter will check resistance. The wire cutters help expose sensor wires. The cloth cleans the sensor for clear readings.
Inspecting The Sensor For Damage
Check the Pt100 sensor for any visible damage. Look for cuts or corrosion on wires. Damaged wires give wrong readings. Replace or repair any damage before testing. A clean sensor ensures accurate results.
Connecting The Sensor Wires
Expose the sensor wires carefully. Strip small parts of insulation without cutting wires. Connect the wires to the multimeter probes. Make sure connections are tight and secure. Loose wires cause unstable readings.
Turn on the multimeter and set it to measure resistance (Ohms). Choose the correct range if your multimeter is not auto-ranging. A proper setup helps get precise resistance values. Ready the multimeter before taking any measurements.
Setting Up The Multimeter
Setting up your multimeter correctly is the first step to check a PT100 sensor accurately. A proper setup ensures reliable readings and protects your device from damage. This section guides you through the essential steps to prepare your multimeter for testing a PT100 sensor.
Choosing The Right Measurement Mode
Turn on your multimeter and select the resistance mode. PT100 sensors measure resistance changes with temperature. Set the multimeter to the lowest resistance range. This setting helps capture small resistance values accurately.
Connecting The Test Leads Properly
Insert the test leads into the correct multimeter ports. The black lead goes to the common (COM) port. The red lead fits into the port marked for resistance (Ω). Ensure the leads are secure and undamaged for accurate results.
Preparing The Pt100 Sensor For Testing
Disconnect the PT100 sensor from the circuit before testing. This prevents interference from other components. Clean the sensor terminals if needed. Dirt or corrosion can affect the resistance reading.
Calibrating The Multimeter If Needed
Check if your multimeter requires calibration. Some models need zeroing before use. Follow the device manual to calibrate properly. Calibration improves measurement accuracy and reliability.

Credit: www.youtube.com
Measuring Resistance Of Pt100
Testing a Pt100 sensor’s resistance is simple with a multimeter. Set the meter to ohms, connect the leads to the sensor wires, and read the resistance. This helps verify the sensor’s accuracy and condition.
Understanding The Resistance Of Pt100
Measuring the resistance of a Pt100 sensor is a simple way to check its condition. Pt100 sensors have a known resistance of 100 ohms at 0°C. This resistance changes as the temperature changes. By measuring resistance, you can estimate the sensor’s temperature.
Resistance measurement helps find faults like breaks or shorts inside the sensor. A faulty Pt100 will show unusual resistance values. This step is important before using the sensor in any system.
Setting Up Your Multimeter
First, turn on your multimeter and set it to the resistance mode (ohms). Choose a range that covers around 0 to 200 ohms. This range fits the typical resistance of Pt100 sensors.
Use the multimeter’s test leads and connect them properly. Ensure the leads are clean and in good condition for accurate readings.
Measuring The Pt100 Resistance
Disconnect the Pt100 sensor from any circuit. Connect the multimeter leads to the sensor’s two wires. Hold the leads steadily to avoid fluctuating readings.
Read the resistance value shown on the multimeter display. At room temperature, the resistance should be near 100 ohms. Higher or lower values may indicate a problem with the sensor.
Interpreting The Resistance Reading
Resistance close to 100 ohms means the sensor is likely good. A very high or infinite reading suggests a broken wire or open circuit. A very low reading may show a short circuit.
Use a temperature-resistance table for Pt100 sensors to compare values. This helps confirm if the sensor matches the expected temperature range.
Interpreting The Multimeter Readings
Reading a multimeter helps check if a Pt100 sensor works correctly. Measure resistance and compare it to standard Pt100 values. This shows if the sensor is accurate or damaged.
Understanding Resistance Values
The multimeter shows resistance in ohms. For a PT100 sensor, the resistance changes with temperature. At 0°C, the resistance is about 100 ohms. As the temperature rises, resistance increases. For example, at 100°C, resistance is around 138.5 ohms. Check your multimeter reading against these standard values.
Recognizing Normal Vs Faulty Readings
Normal PT100 readings fall within expected ranges for given temperatures. A reading much lower than 100 ohms at 0°C may mean a short circuit. A very high or infinite reading suggests a broken wire or open circuit. Consistent readings help confirm the sensor works well. Sudden changes in readings signal sensor issues.
Using Temperature-resistance Charts
Temperature-resistance charts map temperature to resistance values. Use these charts to interpret your multimeter results. Match your resistance reading with the chart to estimate the sensor temperature. This helps verify if the PT100 sensor is accurate. Keep a chart handy during testing for quick reference.
Troubleshooting Common Issues
Troubleshooting common issues with a PT100 sensor is key to getting accurate readings. Problems can happen due to wiring, meter settings, or the sensor itself. Understanding these issues helps fix them fast.
Below are common problems and easy steps to solve them. These tips make your PT100 checks smoother and more reliable.
Checking For Broken Or Damaged Wires
Broken wires cause wrong or no readings. Look closely at the PT100 wires for cuts or bends. Use your multimeter to test wire continuity. If the wire shows open circuit, replace it immediately.
Ensuring Correct Multimeter Settings
Wrong settings lead to bad results. Set your multimeter to the correct resistance range. PT100 sensors usually show resistance near 100 ohms at 0°C. Use the ohms (Ω) mode to get accurate values.
Verifying Sensor Condition
A damaged PT100 sensor gives false readings. Check the sensor for cracks or corrosion. If resistance values are very high or zero, the sensor may be faulty. Replace the sensor if needed.
Handling Connection Issues
Loose connections cause unstable results. Make sure all terminals are tight and clean. Clean any dirt or rust from connectors. A secure connection ensures steady readings on your multimeter.
Tips For Accurate Pt100 Testing
Testing a Pt100 sensor accurately requires careful steps. Small mistakes can lead to wrong readings. Follow these tips to ensure precise results. Proper preparation and technique matter.
Use A Quality Multimeter
Choose a multimeter with good accuracy and resolution. Cheap meters may give false readings. Check the multimeter’s specifications before testing.
Ensure Proper Connections
Connect the sensor wires firmly to the multimeter probes. Loose contacts cause unstable readings. Clean the wire ends if needed for better contact.
Test At Room Temperature
Perform the test in a stable, room-temperature environment. Extreme temperatures affect resistance values. Wait for the sensor to reach room temperature before measuring.
Use The Right Measurement Mode
Set the multimeter to measure resistance, not voltage or current. Resistance mode gives the correct reading for Pt100 sensors. Double-check the mode before starting.
Account For Lead Wire Resistance
Subtract the resistance of test leads from the reading. Longer leads add extra resistance. Use a short lead or a 4-wire measurement for best accuracy.
Handle The Sensor Carefully
Avoid bending or twisting the Pt100 sensor wires. Damage changes resistance and causes errors. Keep the sensor straight and stable during testing.
Frequently Asked Questions
How Do I Test A Pt100 Sensor With A Multimeter?
To test a PT100, set the multimeter to resistance mode. Measure resistance between its terminals. It should read around 100 ohms at 0°C, increasing with temperature.
What Resistance Value Indicates A Good Pt100 Sensor?
A good PT100 shows approximately 100 ohms at 0°C. Resistance increases roughly 0. 385 ohms per °C rise. Deviations may suggest sensor faults.
Can I Use A Digital Multimeter To Check Pt100?
Yes, a digital multimeter with an ohmmeter function can test PT100 sensors by measuring resistance accurately.
How To Identify A Faulty Pt100 Using A Multimeter?
If resistance is infinite, zero, or inconsistent with temperature, the PT100 sensor is likely faulty and needs replacement.
Conclusion
Checking a Pt100 with a multimeter is simple and clear. Start by setting the multimeter to the right mode. Connect the probes carefully to the sensor wires. Read the resistance value shown on the screen. Compare it with the standard Pt100 resistance at room temperature.
Small differences are normal, but large ones may show a problem. This quick test helps ensure your sensor works well. Regular checks keep your measurements accurate and reliable. Practice this method to feel confident using your multimeter with Pt100 sensors.
Easy steps, clear results.

I’m Asif Ur Rahman Adib, an Electrical Engineer and lecturer. My journey began in the lab, watching students struggle with instruments they used every day without fully understanding them. Over time, I’ve combined teaching, research, and hands-on experience to help others grasp electrical concepts clearly, safely, and practically—whether it’s understanding a circuit or mastering a multimeter.