Are you struggling to figure out how to calculate frequency using an oscilloscope? You’re not alone.
Many people find this essential skill confusing at first. But once you understand the simple steps, you’ll be able to measure frequency quickly and accurately every time. You’ll discover clear, easy-to-follow instructions that make using your oscilloscope a breeze. Keep reading, and you’ll gain the confidence to handle your measurements like a pro.
Credit: sparks-activities.concord.org
Basics Of Oscilloscope Frequency
An oscilloscope shows how electrical signals change over time. Frequency is one key measure you can find on this device. It tells how many times a signal repeats in one second. Understanding frequency helps you check if a circuit works right.
Learning about frequency on an oscilloscope needs knowing some basic ideas. This section explains what frequency means and which parts of the oscilloscope help measure it. These basics make it easier to read and use your oscilloscope.
What Frequency Means
Frequency is the number of cycles per second in a signal. It is measured in hertz (Hz). One hertz means one cycle each second. Higher frequency means more cycles each second. For example, 60 Hz means 60 cycles every second.
Frequency shows how fast a signal changes. It helps identify signal types and behaviors. Many electronics need signals with specific frequencies to work well.
Oscilloscope Components Involved
The oscilloscope screen displays the signal wave. This wave moves from left to right, showing time. The horizontal axis shows time, the vertical axis shows voltage.
The time base controls how fast the wave moves across the screen. It helps measure the period of the signal. The period is the time for one complete cycle.
The vertical scale shows the signal strength or voltage. Together, these parts allow you to find the signal’s period. Once you have the period, you can calculate the frequency easily.

Credit: www.youtube.com
Preparing The Oscilloscope
Preparing the oscilloscope is the first step to measure frequency accurately. The device must be ready and set up correctly. This ensures clear and precise readings.
The process involves setting up the device and connecting the signal source carefully. Follow these steps to get started with your oscilloscope.
Setting Up The Device
Place the oscilloscope on a stable surface. Plug it into a power source and turn it on. Wait a few seconds for the device to boot up.
Adjust the brightness and contrast of the screen for easy viewing. Set the time base control to a suitable range for your signal. This controls how fast the waveform moves across the screen.
Set the vertical scale to display the signal amplitude properly. Check that all cables and probes are in good condition. Calibrate the oscilloscope if needed to ensure accurate measurements.
Connecting The Signal Source
Connect the probe to the input channel of the oscilloscope. Attach the probe tip to the point where you want to measure the signal. Connect the ground clip to a common ground point on your circuit.
Make sure the connections are secure. Loose contacts can cause noise and false readings. Use the probe’s compensation adjustment to match the oscilloscope input if required.
Set the input coupling to AC or DC depending on your signal type. This setting filters unwanted components and shows the correct waveform for frequency measurement.
Measuring Time Period
Measuring the time period is a key step to calculate frequency from an oscilloscope. The time period is the duration of one complete wave cycle. You measure this by reading the horizontal scale on the oscilloscope screen. This section explains how to set the oscilloscope and identify one full cycle of the waveform.
Using The Time Base Controls
The time base controls adjust the horizontal scale of the oscilloscope. Use these controls to change the time per division. This setting lets you zoom in or out on the waveform. Adjust until one complete cycle fits well on the screen. This makes it easier to read the time period accurately. Each division represents a fixed amount of time, like microseconds or milliseconds.
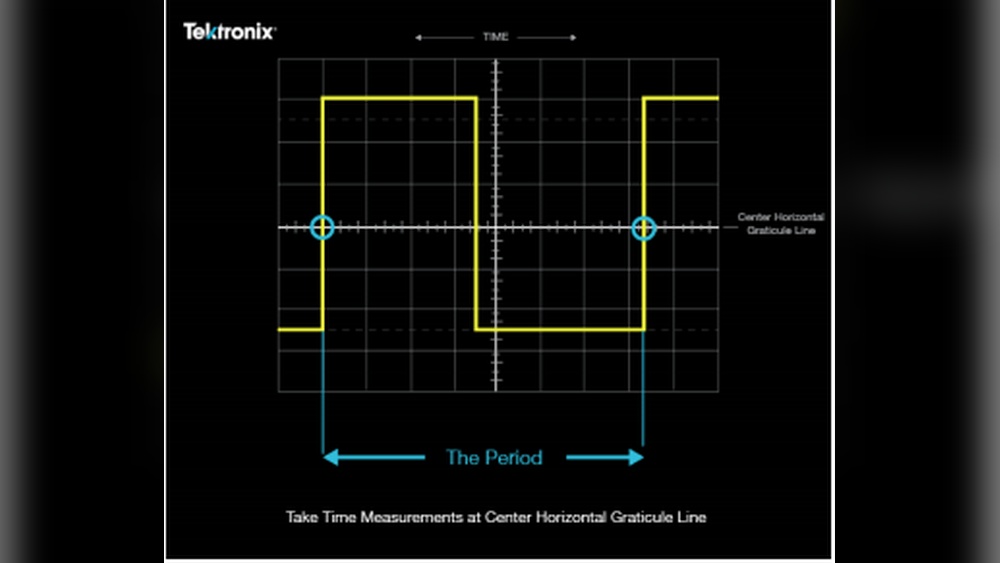
Identifying One Complete Cycle
Find one full cycle of the waveform on the screen. A cycle starts at one point and repeats at the same point on the wave. Look for the pattern to repeat, such as from peak to peak or zero crossing to zero crossing. Count the number of divisions between these points. Multiply the divisions by the time per division to get the time period. This method gives a clear measure of the wave’s duration.
Calculating Frequency
Calculating frequency from an oscilloscope is a key skill for many electronics tasks. Frequency tells how often a signal repeats per second. Using an oscilloscope, you can see the signal wave and measure its time period. This helps find the frequency quickly and accurately. Understanding the steps to calculate frequency improves your testing and troubleshooting.
Formula For Frequency
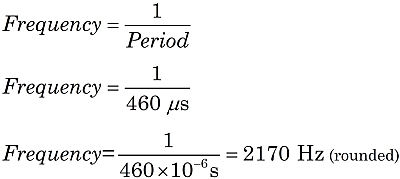
Frequency (f) equals the inverse of the time period (T). The formula is simple:
Here, ‘f’ is frequency in hertz (Hz), and ‘T’ is the time period in seconds (s). The time period is the duration of one complete wave cycle. Measuring this on the oscilloscope screen is the first step to find frequency.
Converting Time Period To Frequency
To convert the time period to frequency, first measure the time period on the oscilloscope. Use the horizontal scale to find the length of one full wave cycle. Note this value in seconds.
Next, apply the formula by dividing 1 by the measured time period. This calculation gives the frequency in hertz. For example, if the time period is 0.002 seconds, the frequency is 1 ÷ 0.002 = 500 Hz.
This method works for any waveform visible on the oscilloscope. It is a direct way to find frequency without guessing or using complex tools.
Using Automatic Frequency Measurement
Using automatic frequency measurement on an oscilloscope saves time and effort. This feature quickly calculates the frequency of a signal without manual steps. It is especially helpful for beginners or those needing fast results. The oscilloscope uses built-in algorithms to analyze the waveform and show the frequency directly on the screen.
Activating Auto Measure Features
First, turn on your oscilloscope and connect the probe to the signal source. Find the “Measure” or “Auto Measure” button on the front panel or in the menu. Press the button to open the measurement options. Select “Frequency” from the list of available parameters. The oscilloscope will start analyzing the waveform automatically. Wait a few seconds for the reading to stabilize. This process works with most modern oscilloscopes and saves manual calculations.
Interpreting Displayed Results
The frequency value appears on the screen, usually near the waveform. It shows in units like Hertz (Hz), kilohertz (kHz), or megahertz (MHz). Check the units carefully to avoid confusion. The number displayed is the frequency of the input signal. If the reading jumps or fluctuates, adjust the time base or signal amplitude. Clear and steady readings mean accurate frequency measurement. Use this value to analyze your circuit or device performance quickly.

Credit: www.youtube.com
Tips For Accurate Readings
Getting accurate frequency readings from an oscilloscope is vital for many tasks. Small changes in settings can cause wrong results. Simple steps help ensure your measurements are clear and precise. Focus on key adjustments to improve the signal view and reduce errors.
Adjusting Trigger Settings
Set the trigger level to stabilize the waveform. A steady wave makes it easier to measure frequency. Use edge triggering to catch rising or falling edges. Choose the correct source channel for the trigger. Avoid auto trigger mode for noisy signals. Adjust trigger holdoff to prevent false triggers. These steps help the oscilloscope lock on the signal.
Reducing Signal Noise
Noise can blur the waveform and hide details. Use averaging mode on your oscilloscope to smooth the signal. Apply a low-pass filter to cut high-frequency noise. Check your probes and cables for damage or loose connections. Keep the test setup away from power lines and other noise sources. Clean, clear signals give more reliable frequency readings.
Common Mistakes To Avoid
Calculating frequency from an oscilloscope can be tricky. Small errors can lead to wrong results. Avoiding common mistakes helps get accurate readings. Pay close attention to the details on the screen. Understanding these errors improves your measurement skills.
Misreading Waveforms
Waveforms can look confusing at first. Mistaking one cycle for multiple cycles leads to errors. Count only one full wave cycle to measure frequency. Watch carefully for distortions or noise in the signal. Noise can make the waveform unclear and hard to read.
Check the waveform shape before measuring. Sine waves differ from square or triangle waves. Each has a unique pattern for frequency calculation. Confirm the waveform is stable and not jumping around. A stable display shows a true signal cycle.
Incorrect Time Base Settings
The time base controls the horizontal scale. Setting it too fast or too slow distorts the view. Wrong time base settings make frequency calculations wrong. Adjust the time base so one or two cycles fit on the screen. This setting makes counting cycles easier and more precise.
Double-check the time divisions marked on the oscilloscope. Use the correct units like milliseconds or microseconds. Incorrect units cause calculation mistakes. Always reset the time base before starting a new measurement. This step ensures consistent and reliable readings.
Frequently Asked Questions
How Do You Measure Frequency On An Oscilloscope?
To measure frequency, observe one full waveform cycle on the oscilloscope screen. Note the time period (T) by counting horizontal divisions. Multiply divisions by the time base setting. Calculate frequency as the inverse: Frequency (f) = 1 / Time period (T).
What Settings Are Best For Frequency Measurement?
Set the time base to display at least one full waveform cycle clearly. Adjust vertical scale for signal amplitude clarity. Use proper probe attenuation. Enable cursor measurement tools if available for more precise frequency readings.
How Can I Calculate Frequency From Time Period?
Frequency is the inverse of the time period. Measure the time for one full cycle on the oscilloscope. Use the formula: Frequency (Hz) = 1 / Time period (seconds). Ensure the time period is in seconds for correct frequency units.
Why Is Waveform Stability Important For Frequency Reading?
Stable waveforms ensure accurate time period measurement. Unstable signals cause fluctuating readings and errors. Use triggering settings to stabilize the waveform before measuring frequency.
Conclusion
Calculating frequency from an oscilloscope is simple with practice. Measure the time period of one full wave carefully. Then, use the formula: frequency equals one divided by the time period. This method helps you understand signals clearly. Regular use improves your skills quickly.
Soon, reading frequency from any oscilloscope becomes easy. Keep your measurements accurate and double-check your results. This approach works for many electronic tasks. Try it yourself to see how useful it can be. Understanding frequency helps in many science and tech projects.

I’m Asif Ur Rahman Adib, an Electrical Engineer and lecturer. My journey began in the lab, watching students struggle with instruments they used every day without fully understanding them. Over time, I’ve combined teaching, research, and hands-on experience to help others grasp electrical concepts clearly, safely, and practically—whether it’s understanding a circuit or mastering a multimeter.