When you’re working with an oscilloscope, understanding the difference between sample rate and frequency can make or break your measurements. If your oscilloscope’s sample rate isn’t high enough, you might miss critical details in your signal.
On the other hand, knowing how frequency affects your readings helps you choose the right settings for accurate results. This article will clear up the confusion and show you how to get the most from your oscilloscope. Keep reading, and you’ll never second-guess your signal analysis again.
Oscilloscope Sample Rate Basics
Understanding oscilloscope sample rate basics helps you capture signals accurately. The sample rate decides how often the oscilloscope records the signal. This affects how clear and detailed the waveform looks on the screen.
Choosing the right sample rate ensures you do not miss important signal details. It also helps avoid errors in signal measurement and analysis.
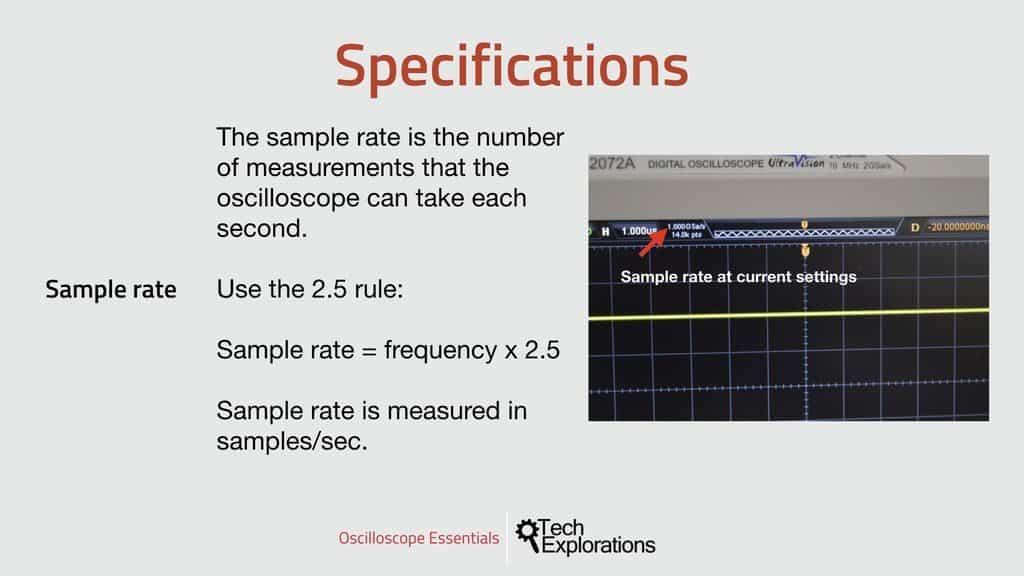
What Is Sample Rate
Sample rate is the number of samples taken per second by the oscilloscope. It is measured in samples per second (S/s) or megasamples per second (MS/s). Higher sample rates mean more data points for the signal.
More data points allow the oscilloscope to recreate the signal more accurately. A low sample rate can miss fast changes in the signal and cause errors.
How Sample Rate Affects Signal Capture
The sample rate affects how well the oscilloscope shows signal details. If the sample rate is too low, the waveform may look distorted or incomplete. This is called aliasing.
To capture a signal correctly, the sample rate must be at least twice the signal frequency. This rule is known as the Nyquist rate. Following this helps avoid losing important signal information.
Higher sample rates provide clearer and smoother waveforms. They also make it easier to spot small signal changes or noise.
Frequency Fundamentals
Frequency is a key concept in understanding signals and oscilloscopes. It tells how many cycles a wave completes in one second. Frequency affects how signals look on an oscilloscope screen. Knowing frequency basics helps in choosing the right sample rate for accurate readings.
Signals with different frequencies behave differently. Low frequencies show slower waves. High frequencies create faster, more complex waveforms. This section explains frequency and its effect on waveforms.
Defining Signal Frequency
Signal frequency measures cycles per second. It is expressed in hertz (Hz). One hertz means one cycle each second. For example, a 100 Hz signal completes 100 cycles every second.
Frequency determines the speed of a waveform. Higher frequency means faster oscillations. Lower frequency means slower waveforms. Frequency is a basic property of any electrical signal.
Frequency Impact On Waveforms
Frequency changes how waveforms appear on an oscilloscope. At low frequencies, waves look stretched out and easy to read. At high frequencies, waves become tight and fast.
High frequency signals need faster sample rates. Slow sample rates may miss details of fast waves. This causes inaccurate or distorted images on the screen.
Understanding frequency helps set the correct oscilloscope sample rate. This ensures clear and precise waveform capture.
Sample Rate And Frequency Relationship
The sample rate and frequency relationship is key in oscilloscope measurements. Sample rate means how many times the oscilloscope captures data per second. Frequency refers to how fast a signal changes or repeats. The sample rate must be high enough to accurately capture the signal’s frequency. If the sample rate is too low, the oscilloscope might miss important details of the signal. This can lead to wrong or unclear results. Understanding this relationship helps in choosing the right settings for clear measurements.
Nyquist Theorem And Its Role
The Nyquist Theorem explains the minimum sample rate needed. It says the sample rate must be at least twice the highest frequency of the signal. This rate is called the Nyquist rate. Sampling below this rate causes errors in the signal capture. The theorem helps avoid these errors by setting a clear rule. It ensures the oscilloscope records the true shape of the signal. Following the Nyquist rate is crucial for reliable measurements.
Avoiding Aliasing In Measurements
Aliasing happens when the sample rate is too low. It makes high-frequency signals look like lower frequencies. This confusion leads to wrong analysis and decisions. To avoid aliasing, always sample above the Nyquist rate. Using filters before sampling can also help by removing frequencies above half the sample rate. Clear signals give better insights and reduce mistakes. Proper sample rate choice keeps the measurements true and useful.

Credit: www.youtube.com
Choosing The Right Sample Rate
Choosing the right sample rate for your oscilloscope is key to getting accurate signal measurements. The sample rate decides how often the oscilloscope takes a measurement of the signal. Picking the correct rate helps you see the signal clearly without missing important details.
Too low a sample rate can cause errors and make the signal hard to understand. Too high a rate can waste memory and processing power. Finding the balance improves the quality of your data and makes your work easier.
Matching Sample Rate To Signal Frequency
Set the sample rate at least twice the highest frequency of your signal. This rule is called the Nyquist rate. Sampling below this rate causes errors called aliasing. Aliasing makes signals appear distorted or shows false frequencies.
For example, if your signal frequency is 1 MHz, set the sample rate to at least 2 MHz. Higher sample rates give clearer signal shapes and details. But very high rates need more memory and can slow down the oscilloscope.
Effects Of Low Sample Rates
Low sample rates miss fast changes in the signal. This leads to a loss of important information. The waveform may look smooth or flat, hiding spikes or glitches.
Low rates can also create false signals. These wrong signals confuse analysis and lead to wrong conclusions. Noise and errors increase, making the signal less reliable.
Always check the sample rate before measuring. Choose a rate that captures the signal well and avoids mistakes.
Practical Examples
Understanding the difference between oscilloscope sample rate and frequency becomes clearer with real examples. Practical cases show how sample rate affects signal capture. This helps avoid mistakes in signal measurement and interpretation. Below are two examples that explain the concept well.
Sampling A High-frequency Signal
High-frequency signals change very fast. To capture them accurately, the oscilloscope needs a high sample rate. The sample rate must be at least twice the highest frequency of the signal. This rule is called the Nyquist rate.
If the sample rate is too low, the oscilloscope shows a distorted signal. This distortion is called aliasing. Aliasing makes the signal look slower or different than it really is. For example, a 10 MHz signal needs at least a 20 MS/s sample rate to be clear.
Using a higher sample rate than the minimum improves detail. It helps see small changes in the waveform. This is important in testing fast digital circuits or radio signals.
Sampling A Low-frequency Signal
Low-frequency signals change slowly. They do not need a very high sample rate. Sampling too fast wastes memory and processing power.
A sample rate about ten times the signal frequency is usually enough. For example, a 1 kHz signal can be captured well with a 10 kS/s sample rate.
Lower sample rates still show the waveform shape clearly. It also makes it easier to analyze long signal periods. This is useful in audio testing or monitoring slow sensors.

Credit: www.allaboutcircuits.com
Common Misconceptions
Many people confuse oscilloscope sample rate with frequency and bandwidth. This confusion leads to wrong assumptions about what each term means. Understanding these differences helps in choosing the right oscilloscope for your needs. It also ensures accurate signal measurement and analysis.
Sample Rate Vs Bandwidth
Sample rate is how many times the oscilloscope captures data per second. Bandwidth is the highest frequency the scope can measure accurately. They are related but not the same. A high sample rate does not always mean a high bandwidth. Bandwidth limits the frequency range, while sample rate affects signal detail.
When Higher Sample Rate Doesn’t Help
Increasing sample rate beyond a point does not improve signal clarity. If bandwidth is low, the scope cannot measure higher frequencies well. Oversampling can create large files without better results. Good measurement needs balance between sample rate and bandwidth. Choose a scope that matches both your signal frequency and detail needs.
Improving Measurement Accuracy
Improving measurement accuracy is vital when working with oscilloscopes. Precise readings depend on capturing the true shape of the signal. This accuracy relies heavily on the oscilloscope’s sample rate and how it handles frequency. Better methods help reduce errors and reveal clearer signal details. Below are key techniques that enhance measurement accuracy.
Using Oversampling Techniques
Oversampling means capturing more data points than the minimum required. It creates a finer picture of the signal. This technique helps detect small changes and fast transitions in the waveform. Sampling faster than twice the highest signal frequency reduces distortion. More samples allow better reconstruction of the original signal shape. This improves the clarity and reliability of measurements.
Filtering And Signal Conditioning
Filtering removes unwanted noise from the signal before measurement. Clean signals produce more accurate readings. Low-pass filters block high-frequency noise that can confuse the oscilloscope. Signal conditioning adjusts the signal strength to match the oscilloscope’s input range. Proper conditioning prevents distortion and clipping. Both filtering and conditioning stabilize the signal and improve measurement quality.
Credit: techexplorations.com
Frequently Asked Questions
What Is Oscilloscope Sample Rate?
Oscilloscope sample rate is how many data points it records per second. Higher rates capture signals more accurately. It directly affects waveform resolution and clarity. For precise measurements, a sample rate at least twice the signal frequency is essential.
How Does Sample Rate Affect Frequency Measurement?
Sample rate determines how well an oscilloscope captures signal frequency. If the sample rate is too low, it may cause aliasing. Proper sample rates prevent distortion and ensure accurate frequency representation. Always choose a sample rate at least twice the highest signal frequency.
Why Is Sample Rate Important In Oscilloscopes?
Sample rate impacts the detail and accuracy of waveform capture. Higher sample rates provide clearer, more precise signal visualization. It helps detect fast signal changes and subtle features. Choosing the right sample rate ensures reliable test results and analysis.
Can Low Sample Rate Distort Frequency Readings?
Yes, a low sample rate can distort frequency readings. It causes aliasing, making signals appear at incorrect frequencies. This leads to inaccurate measurements and misinterpretation. To avoid this, always use a sample rate higher than twice the signal frequency.
Conclusion
Choosing the right sample rate is key for accurate oscilloscope readings. A higher sample rate captures more detail in signals. It helps to see the true shape of waveforms. Matching sample rate to signal frequency avoids missing important data. Too low a sample rate can cause errors and confusion.
Always check your oscilloscope’s specs before testing. Clear signals lead to better results and easier analysis. Understanding this balance improves your measurements every time. Simple but important for good electronic work.

I’m Asif Ur Rahman Adib, an Electrical Engineer and lecturer. My journey began in the lab, watching students struggle with instruments they used every day without fully understanding them. Over time, I’ve combined teaching, research, and hands-on experience to help others grasp electrical concepts clearly, safely, and practically—whether it’s understanding a circuit or mastering a multimeter.