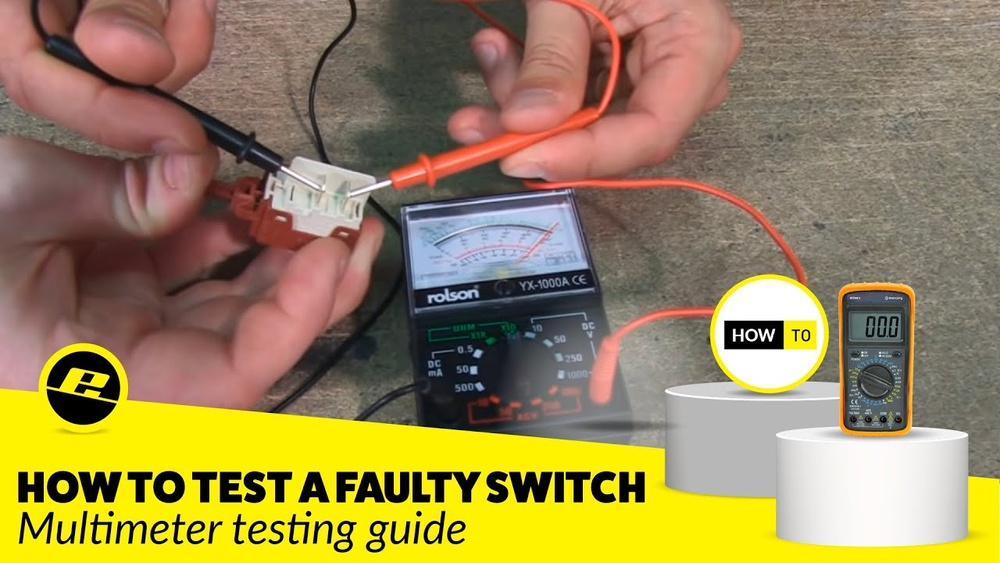
Are you struggling to figure out if your switch is working properly? Using a multimeter to test a switch is a simple skill that can save you time and money on repairs.
Whether you want to check a light switch, a car switch, or any electrical switch, knowing how to use your multimeter correctly will give you confidence and clear answers. In this guide, you’ll learn step-by-step how to test a switch safely and accurately.
By the end, you’ll be able to spot faulty switches with ease and keep your electrical projects running smoothly. Ready to become your own electrical troubleshooter? Let’s dive in!
Credit: www.coolcircuit.com
Safety Precautions
Safety is the top priority when using a multimeter for testing a switch. Electric shock or damage to the device can happen without proper care. Follow clear safety steps to protect yourself and your equipment. These simple precautions make your testing process safer and more effective.
Turn Off Power
Always switch off the power before testing a switch. This prevents electric shock and protects the multimeter. Locate the circuit breaker or fuse that controls the switch. Turn it off fully. Double-check that the power is off by trying to operate the switch or using a non-contact voltage tester. Never touch live wires with the multimeter probes.
Verify Multimeter Function
Check your multimeter before use to ensure it works correctly. Set the multimeter to the correct mode for testing switches, usually continuity or resistance. Test the probes by touching them together. The multimeter should beep or show zero resistance. This confirms the device is ready and accurate. Faulty equipment can give wrong readings or cause harm.
:max_bytes(150000):strip_icc()/testing-single-pole-switches-1152811-06-e8b6afe135fa4ac08f965f58b8f16310.jpg)
Credit: www.thespruce.com
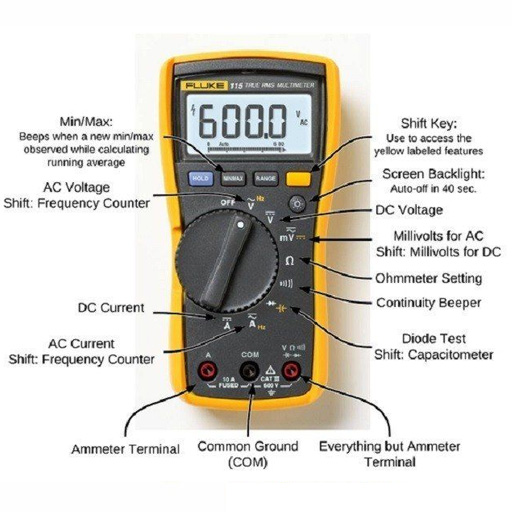
Multimeter Settings For Switch Testing
Using the right multimeter settings is key to testing switches accurately. Switches control electrical flow, so checking their function keeps circuits safe. Different modes on a multimeter help measure various electrical properties in switches. Understanding each setting lets you find faults fast and with ease.
Continuity Mode
Continuity mode tests if the switch completes a circuit. Set the multimeter to continuity, often shown as a sound wave symbol. Touch the probes to the switch terminals. A beep means the switch allows current to pass. No sound means the switch is open or broken. This mode is ideal for quick switch checks.
Resistance Mode
Resistance mode measures how much a switch resists electrical flow. Set the multimeter to the ohm (Ω) symbol. Place probes on the switch terminals. A low resistance value means the switch is good. High or infinite resistance means the switch is damaged or off. This mode helps find subtle switch problems.
Voltage Mode
Voltage mode checks power at the switch terminals. Set the multimeter to voltage, usually marked as V with a straight or wavy line. Test the switch while it is connected and powered. Measure voltage across terminals to see if current reaches the switch. This mode shows if the switch receives power correctly.
Testing An Uninstalled Switch
Testing an uninstalled switch with a multimeter is a simple way to check its condition. You do not need to connect the switch to any circuit. This method saves time and helps avoid wiring mistakes.
Follow three clear steps to test your switch accurately. First, locate the terminals on the switch. Then, test the switch in the off position. Finally, check the switch in the on position. Each step ensures the switch works properly before installation.
Locate Terminals
Look closely at your switch to find the terminals. Terminals are small metal points where wires connect. Usually, a switch has two or three terminals. Clean the terminals if they look dirty or rusty. Proper contact is important for accurate testing.
Check Switch Off Position
Turn your switch to the off position. Set your multimeter to the continuity or resistance mode. Touch the multimeter probes to the terminals. The meter should show no continuity or a very high resistance. This means the switch is open and not allowing current to pass.
Check Switch On Position
Flip the switch to the on position. Keep the multimeter probes on the same terminals. The multimeter should now show continuity or very low resistance. This indicates the switch is closed and allows current through. If readings do not change, the switch may be faulty.
Testing An Installed Switch
Testing an installed switch ensures it works correctly and safely. Use a multimeter to check the switch without removing it completely. This process helps find faults like broken connections or no power flow. Follow simple steps carefully to get accurate results.
Remove Cover Plate
Turn off the power at the circuit breaker to stay safe. Use a screwdriver to remove the switch’s cover plate. This exposes the switch and its terminals. Keep the screws safely for reassembly. Do not touch wires directly before confirming power is off.
Test For Voltage
Set the multimeter to measure AC voltage. Place the black probe on a grounded metal part or neutral wire. Touch the red probe to each terminal on the switch. A voltage reading means the switch receives power. No voltage suggests a wiring issue or breaker problem.
Test For Continuity
Turn off the power again before testing continuity. Set the multimeter to continuity mode. Touch the probes to the two switch terminals. Flip the switch on and off during the test. The multimeter beeps or shows zero when the switch is on and working. No beep means the switch is faulty and may need replacement.
Interpreting Multimeter Readings
Interpreting multimeter readings is key to testing switches accurately. Understanding what the meter shows helps you know if the switch works or not. You learn how to read continuity, resistance, and voltage values. These simple checks reveal the switch’s condition fast. This guide breaks down common multimeter signals when testing switches.
Continuity Beep Or Low Ohms
A beep or low resistance means good continuity. The switch allows current to pass through. This shows the switch is ON or closed. Low ohms usually range near zero, proving no break in the circuit. Use this reading to confirm the switch completes the electrical path.
No Beep Or High Resistance
No beep or very high resistance means no continuity. The switch is OFF or open. This reading means the circuit is broken, stopping current flow. High resistance often shows “OL” or a very large number on digital meters. It signals a faulty or open switch if the switch should be closed.
Voltage Presence
Measuring voltage checks if power reaches the switch. A voltage reading means the switch receives current from the source. No voltage means no power or a disconnected circuit. This test helps find wiring or supply problems before checking the switch itself. Always test voltage with care and proper settings.

Credit: www.youtube.com
Common Switch Faults And Diagnosis
Understanding common switch faults helps in quick and accurate diagnosis. Switches often fail due to simple issues that a multimeter can detect. Learning these faults improves your repair skills and saves time. Below are common switch problems and how to diagnose them using a multimeter.
Open Circuit
An open circuit means no electrical connection inside the switch. The multimeter shows infinite resistance or no continuity. To test, set the multimeter to continuity mode. Touch the probes to the switch terminals. No beep or a very high reading indicates an open circuit. This fault stops current flow and makes the switch useless.
Short Circuit
A short circuit happens when internal parts touch incorrectly. The multimeter shows very low or zero resistance. Set the multimeter to resistance mode and check the terminals. A near zero reading means a short circuit. This fault can cause sparks or damage to the circuit. Replace the switch immediately if you find this problem.
Intermittent Contact
Intermittent contact means the switch connection breaks sometimes. It causes flickering lights or inconsistent operation. Test by gently toggling the switch while measuring continuity. The multimeter reading will change between low and high resistance. This fault is tricky to find but using a multimeter carefully helps. Cleaning or replacing the switch often fixes the issue.
Tips For Accurate Testing
Accurate testing with a multimeter is key to checking switches correctly. Simple mistakes can lead to wrong readings or damage. Follow these tips to ensure your tests give reliable results every time. Pay close attention to probe placement, switch activation, and connection checks. These steps help avoid confusion and save time.
Probe Placement
Place the multimeter probes firmly on the switch terminals. Ensure each probe touches the metal part directly. Avoid touching the probe tips with your fingers. This prevents false readings and electric shocks. Hold the probes steady during the test for consistent results. Clean terminals improve contact and accuracy. Use a steady hand to avoid slipping off the terminals.
Switch Activation By Helper
Ask someone to operate the switch while you test. This helps check if the switch opens and closes the circuit properly. Test the switch in both on and off positions. A helper can toggle the switch quickly without interrupting your probe placement. This method shows if the switch changes the multimeter reading as it should. Testing with a helper confirms the switch’s true function.
Double Checking Connections
Verify all wires and terminals are secure before testing. Loose connections cause unstable or no readings. Check if wires are connected to the correct switch terminals. Double check the multimeter settings for continuity or resistance mode. Re-check the probe placement if readings seem odd. Confirming connections prevents misdiagnosis of the switch’s condition. Take time to review each step carefully.
Frequently Asked Questions
How To Use A Multimeter On A Switch?
Set the multimeter to continuity or ohms mode. Turn off power. Touch probes to switch terminals. ON shows beep or near zero ohms; OFF shows no beep or infinite resistance.
How To Test If A Switch Is Bad?
Use a multimeter set to continuity or ohms. Turn off power, test switch terminals. A good switch shows continuity ON and none OFF.
How To Test Power To A Light Switch?
Use a non-contact voltage tester near switch wires to check power without touching. A beep or light means power is present.
How To Use A Multimeter To Test A Light Circuit?
Set the multimeter to continuity or resistance mode. Turn off power. Test switch terminals; a beep or near zero ohms shows continuity. Turn switch off; no beep means open circuit. For live circuits, use voltage mode carefully. Always prioritize safety by disconnecting power first.
Conclusion
Using a multimeter to test a switch is simple and effective. Always ensure the switch is off before testing. Touch the probes to the switch terminals carefully. A reading of zero means the switch has continuity. No reading shows the switch is open or faulty.
Regular testing helps keep your electrical system safe. Practice these steps to feel confident using a multimeter on switches. This knowledge saves time and prevents electrical problems. Try it yourself and see how easy it is.

I’m Asif Ur Rahman Adib, an Electrical Engineer and lecturer. My journey began in the lab, watching students struggle with instruments they used every day without fully understanding them. Over time, I’ve combined teaching, research, and hands-on experience to help others grasp electrical concepts clearly, safely, and practically—whether it’s understanding a circuit or mastering a multimeter.