If you want accurate and reliable measurements from your oscilloscope, knowing how to calibrate it is essential. Without proper calibration, your readings can be misleading, causing frustration and errors in your work.
But don’t worry—calibrating your oscilloscope is easier than you might think. You’ll discover simple, step-by-step instructions that will help you get your device working perfectly. By the end, you’ll feel confident that your oscilloscope is ready to deliver precise results every time you use it.
Keep reading to unlock the secrets of perfect calibration and take full control of your measurements.
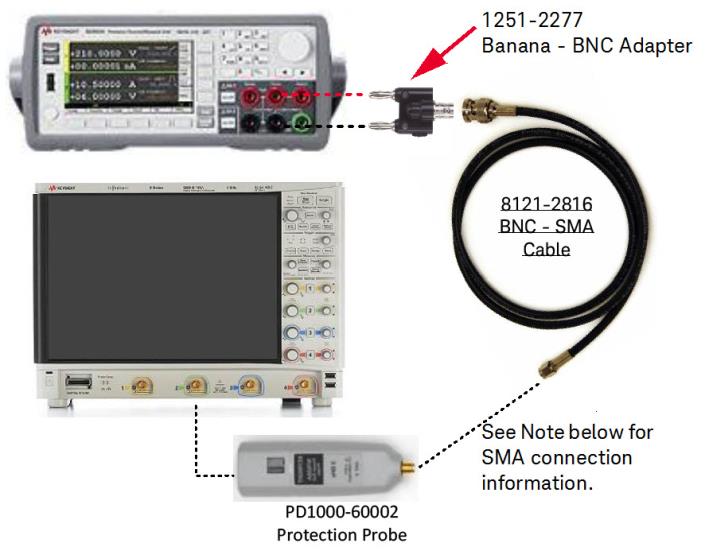
Credit: helpfiles.keysight.com
Why Calibration Matters
Calibration keeps your oscilloscope accurate and reliable. It ensures the measurements you take are correct. Without calibration, data can be wrong or misleading. This can cause errors in your work or tests. Regular calibration keeps the oscilloscope working at its best.
Calibration also extends the life of your device. It helps catch issues early before they become serious. A well-calibrated oscilloscope saves time and money in repairs. It also improves safety by ensuring signals are measured correctly.
What Calibration Does For Accuracy
Calibration adjusts the oscilloscope to match known standards. It removes errors caused by age or use. This process makes sure every reading is precise. Accurate readings help you trust your test results. It also helps in comparing data over time or between devices.
Impact On Signal Integrity
Signal integrity means the signal is clear and true. Calibration helps maintain this integrity by correcting distortions. It reduces noise and signal loss during measurement. Clean signals lead to better analysis and decisions. Poor calibration can hide problems or cause false alarms.
Compliance With Industry Standards
Many industries require calibrated equipment for safety and quality. Calibration ensures your oscilloscope meets these rules. It helps pass audits and inspections smoothly. Using calibrated tools builds trust with customers and partners. It also avoids fines or penalties for non-compliance.
Improving Your Workflow
Calibration reduces the need for repeated tests. It speeds up the measurement process and increases productivity. You spend less time fixing errors and more time on real work. Reliable data helps you make quick and confident decisions. Overall, calibration makes your workflow smoother and easier.
Tools Needed For Calibration
Calibrating an oscilloscope requires specific tools to ensure accuracy. These tools help check and adjust the device correctly. Using the right tools saves time and improves results.
Below are the essential tools needed for oscilloscope calibration. Each plays a key role in the process.
Signal Generator
A signal generator produces known waveforms and frequencies. It helps test the oscilloscope’s response to different signals. Choose a generator that covers the oscilloscope’s frequency range.
Calibration Probe
A calibration probe connects the oscilloscope to the signal source. It must be accurate and match the oscilloscope’s specifications. A good probe reduces measurement errors during calibration.
Reference Voltage Source
This tool provides a stable voltage for verifying amplitude accuracy. Use a voltage source with low noise and precise output. It ensures the oscilloscope reads voltage levels correctly.
Multimeter
A multimeter checks the voltage and continuity of calibration tools. It verifies the probe and reference source before use. This step prevents errors caused by faulty equipment.
Documentation And Calibration Software
Calibration software guides the process and records results. Documentation includes manuals and calibration certificates. They help maintain calibration standards and traceability.
Preparing The Oscilloscope
Preparing the oscilloscope is the first step in accurate calibration. This process ensures the device works properly before you start measuring signals. Taking time to prepare helps avoid errors and unreliable results.
Warm-up Period
Turn on the oscilloscope and let it warm up. Most oscilloscopes need time to stabilize. This period usually lasts five to ten minutes. During warm-up, the internal circuits reach normal operating temperature. This step improves measurement accuracy.
Initial Settings Check
Check the oscilloscope’s initial settings before calibration. Set the vertical and horizontal controls to default positions. Make sure the probe is connected correctly. Verify the input coupling is set to DC. Confirm the time base and voltage scale match your test needs.

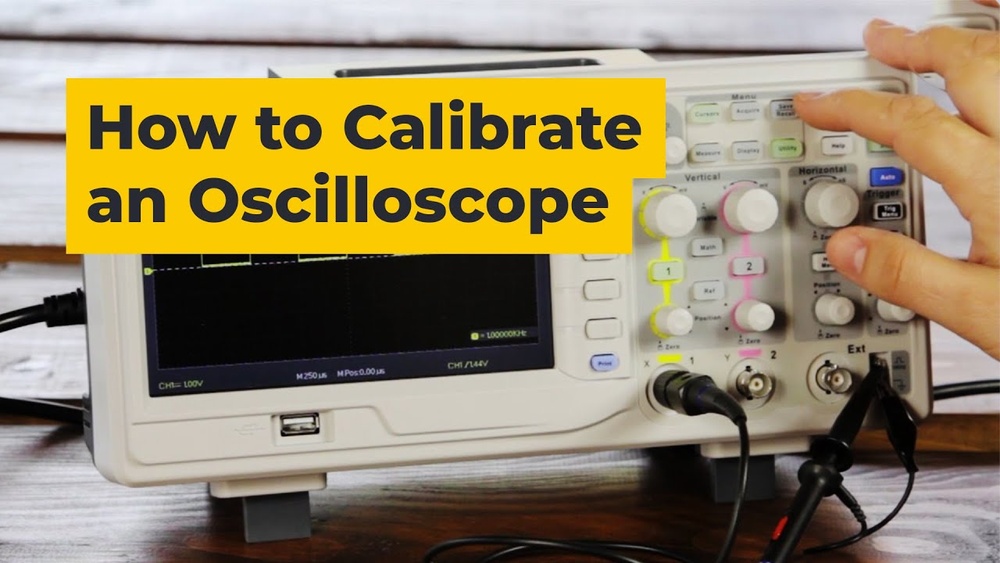
Credit: www.youtube.com
Connecting The Calibration Signal
Start by connecting the calibration signal output to the oscilloscope input. This step ensures accurate measurement and proper adjustment of the device. Check the connection is secure before proceeding with calibration.
Preparing Your Oscilloscope For Calibration
Start by turning on your oscilloscope. Let it warm up for a few minutes. This ensures stable readings. Set the vertical and horizontal controls to standard positions. Usually, this means setting volts/div and time/div to middle values.
Locating The Calibration Signal Output
Find the calibration signal output on your oscilloscope. It is often a small terminal labeled “CAL” or “Probe Comp.” This output sends a known test signal. Use it to adjust your probe and oscilloscope settings.
Connecting The Probe To The Calibration Signal
Attach your oscilloscope probe to the calibration output terminal. Make sure the probe tip and ground clip connect securely. Poor connection can cause incorrect calibration. Hold the probe steady to avoid noise or signal loss.
Adjusting Vertical Accuracy
Adjusting vertical accuracy is a key step in calibrating an oscilloscope. It ensures the voltage readings on the screen are precise. This adjustment helps measure signals correctly and avoid errors during testing.
The vertical system controls how voltage signals appear on the display. Proper calibration means the voltage scale matches the real input voltage. This accuracy is vital for engineers and technicians who rely on clear, exact data.
Setting Voltage Scale
Start by connecting a known reference voltage to the oscilloscope input. Use a stable signal source with a fixed voltage level. Adjust the vertical scale knob until the waveform height matches the known voltage.
Use the oscilloscope’s menu or controls to select the correct volts per division. Each division on the screen should represent the exact voltage value. Fine-tune the scale until the displayed waveform matches the reference signal.
Verifying Amplitude
Check the waveform amplitude against the reference voltage. Use the cursor or measurement tools on the oscilloscope. Confirm the peak-to-peak voltage matches the expected value.
If the amplitude is off, adjust the vertical gain or calibration settings. Repeat the measurement to ensure accuracy. Accurate amplitude display confirms the vertical system is properly calibrated.
Adjusting Horizontal Accuracy
Adjusting the horizontal accuracy of an oscilloscope is key to getting precise time measurements. This step ensures the time base matches real-time signals. Without proper adjustment, readings can be misleading. The following sections guide you through setting and verifying the time intervals for accurate results.
Setting Time Base
Start by selecting the time base control on your oscilloscope. This control adjusts how much time each division on the screen represents. Choose a time base that fits the signal you want to measure. For example, faster signals need a shorter time base per division. Adjust the knob slowly until the waveform fits well on the screen. This setup helps you see the full shape of the signal clearly.
Verifying Time Intervals
Next, verify the time intervals using a known reference signal. A function generator or calibration signal works well. Compare the displayed waveform period with the expected period. Use the grid lines on the screen to count divisions accurately. If the measured time is off, adjust the time base calibration control. Repeat the check until the displayed time matches the reference signal closely. This step confirms the horizontal accuracy of your oscilloscope.
Fine-tuning Trigger Settings
Fine-tuning trigger settings is a key step in calibrating an oscilloscope. It helps capture stable, clear waveforms for accurate measurement. Proper trigger adjustments reduce noise and signal distortion. This process improves your oscilloscope’s performance and your test results.
Understanding the trigger controls lets you set the right trigger level and slope. This ensures the oscilloscope triggers at the correct signal point. Fine-tuning also allows you to filter unwanted signals and focus on the waveform of interest.
Adjusting The Trigger Level
Start by setting the trigger level near the signal baseline. Move the level slowly until the waveform stabilizes. This controls when the oscilloscope begins to capture the signal. A correct trigger level prevents the waveform from drifting or jumping.
Selecting The Trigger Slope
Choose the trigger slope based on the signal edge. Use the rising edge to trigger on an upward signal change. Use the falling edge for a downward change. This helps capture the waveform at the exact moment you want.
Choosing The Trigger Mode
Set the trigger mode to match your signal type. Auto mode triggers continuously for repetitive signals. Normal mode triggers only when the signal meets the trigger condition. Single mode captures one waveform and then stops.
Using Trigger Holdoff
Trigger holdoff controls time between triggers. Increase holdoff to avoid false triggers from noise. This lets the oscilloscope ignore unwanted signal parts. Proper holdoff makes waveforms easier to analyze.
Verifying Calibration Results
Verifying calibration results is a key step after adjusting your oscilloscope. It confirms the device measures signals accurately. Without verification, you might get wrong readings, which can cause errors in your work.
Testing your oscilloscope with known signals and checking if the waveform remains steady helps ensure the calibration is correct. These checks give confidence in the device’s performance and reliability.
Using Known Reference Signals
Use a signal generator to send a known reference signal to your oscilloscope. A common choice is a 1 kHz sine wave with a fixed voltage. Compare the displayed waveform with the expected signal.
If the amplitude, frequency, and shape match the reference, the calibration is accurate. If not, repeat the calibration process or adjust settings. This method provides a clear way to verify the oscilloscope’s measurements.
Checking Waveform Stability
Observe the waveform for stability over time. A stable waveform does not flicker or drift. It holds steady at the same amplitude and frequency.
Unstable waveforms may indicate calibration issues or hardware problems. Ensuring stability helps confirm the oscilloscope displays signals correctly. This step is simple but critical for reliable readings.
Maintaining Calibration
Maintaining calibration keeps your oscilloscope accurate and reliable. It helps avoid errors in measurements and ensures consistent performance. Proper care and routine checks extend the device’s lifespan and save repair costs.
Regular Calibration Schedule
Set a regular schedule for calibration checks. Follow the manufacturer’s guidelines for timing. Usually, calibration every six to twelve months works well. Record each calibration date and results. Regular checks catch problems early and maintain accuracy.
Storage And Handling Tips
Store the oscilloscope in a clean, dry place. Avoid extreme temperatures and humidity. Handle the device gently to prevent damage. Use the original case or protective cover when not in use. Clean the device with a soft cloth to remove dust and dirt.

Credit: www.reddit.com
Frequently Asked Questions
What Is The Purpose Of Oscilloscope Calibration?
Oscilloscope calibration ensures accurate voltage and time measurements. It maintains device precision by adjusting internal settings. Regular calibration prevents measurement errors and extends oscilloscope lifespan. Proper calibration is vital for reliable electronic testing and troubleshooting.
How Often Should You Calibrate An Oscilloscope?
Oscilloscopes should be calibrated annually or after any repair. Frequent calibration is essential for critical measurements in labs or production. Some manufacturers recommend calibration every 6 months. Following a consistent schedule maintains device accuracy and performance.
What Tools Are Needed For Oscilloscope Calibration?
Calibration requires a signal generator, precision voltage source, and known frequency reference. Calibration software or built-in oscilloscope functions are also helpful. Using high-quality tools ensures accurate adjustments. Proper equipment is critical for effective oscilloscope calibration.
Can I Calibrate An Oscilloscope Myself?
Yes, basic calibration can be done by users following the manual. Advanced calibration may require professional service and specialized equipment. Always verify calibration results with known standards. Proper knowledge and tools are necessary for accurate self-calibration.
Conclusion
Calibrating your oscilloscope ensures accurate and reliable measurements. Follow the steps carefully for best results. Regular calibration keeps your device working well over time. It helps you avoid errors and saves time later. Keep your tools clean and check settings often.
This simple practice improves your testing and troubleshooting. Stay consistent and watch your work quality improve. Simple, clear, and precise calibration matters for every user.

I’m Asif Ur Rahman Adib, an Electrical Engineer and lecturer. My journey began in the lab, watching students struggle with instruments they used every day without fully understanding them. Over time, I’ve combined teaching, research, and hands-on experience to help others grasp electrical concepts clearly, safely, and practically—whether it’s understanding a circuit or mastering a multimeter.