Are you having trouble with your PTO clutch and unsure if it’s working properly? Testing your PTO clutch with a multimeter is a simple step you can take right now to find out if it’s in good shape or needs attention.
In this guide, you’ll learn easy-to-follow steps that anyone can do, even if you’re not a mechanic. By the end, you’ll have the confidence to check your clutch yourself and save time and money on repairs. Keep reading to discover how to test your PTO clutch quickly and accurately with just a multimeter.
Credit: gcmonline.com
Tools Needed
Testing a PTO clutch with a multimeter requires the right tools. Proper equipment makes the job easier and more accurate. Knowing what to use helps you avoid mistakes and saves time.
Start with a good multimeter designed for electrical testing. You also need some extra tools to handle the clutch safely and correctly. The right gear protects you and your equipment.
Choosing The Right Multimeter
Pick a multimeter that measures resistance and voltage. Digital multimeters are easier to read and more accurate. Look for one with a continuity test feature. This helps check if the clutch coil is working. Make sure the multimeter has good battery life for uninterrupted use.
Additional Equipment
Get insulated gloves to protect your hands from electric shocks. Use a screwdriver to remove covers and access the clutch terminals. A flashlight helps see small parts in dark spaces. Keep a clean cloth handy to wipe dirt or grease off the clutch. These tools help you test safely and clearly.
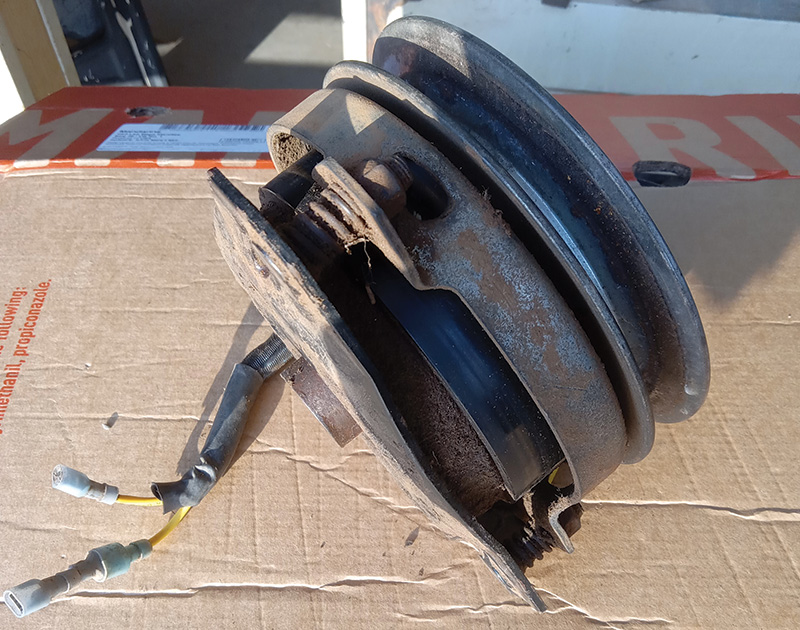
Credit: www.lawnsite.com
Preparing The Pto Clutch
Testing a PTO clutch with a multimeter checks if it works properly. Start by setting the multimeter to measure resistance. Then, connect the leads to the clutch terminals and read the display for any faults.
Safety Precautions
Start by turning off the machine and removing the key. This stops any accidental starting of the PTO clutch. Wear gloves to protect your hands from sharp parts. Use safety glasses to shield your eyes from dust or debris. Make sure the area around the machine is clear and well-lit. Avoid loose clothing that could get caught in moving parts. Double-check that the engine is cool before working near the clutch.
Accessing The Clutch
Locate the PTO clutch on your machine. Usually, it is near the engine or transmission. Remove any covers or guards that block access. Use the correct tools to avoid damaging bolts or screws. Keep the removed parts in a safe place for reassembly. Clean the area around the clutch to prevent dirt from entering. Ensure you have enough space to work comfortably on the clutch.
Setting Up The Multimeter
Setting up the multimeter correctly is the first step to test a PTO clutch accurately. This ensures you get the right readings without damaging the device or the clutch. Follow simple steps to prepare your multimeter for the task.
Selecting The Correct Mode
Turn on the multimeter and check the dial. Set it to measure resistance or ohms (Ω). This mode helps check if the PTO clutch coil has continuity. Avoid using voltage or current modes for this test. Choose the lowest resistance range for better accuracy.
Calibrating The Device
Before starting, calibrate the multimeter to ensure accurate readings. Touch the two probes together. The display should show zero or very close to zero ohms. If not, adjust the meter to zero or check the battery. Proper calibration avoids false readings during testing.
Testing Resistance
Testing resistance is a key step in checking a PTO clutch with a multimeter. It helps find electrical faults that stop the clutch from working. A multimeter measures how much the clutch resists electric current. This tells if the clutch coil is good or bad. Low or very high resistance means a problem.
Next, learn how to find the right test points on the clutch coil. Then, see how to read the resistance values correctly.
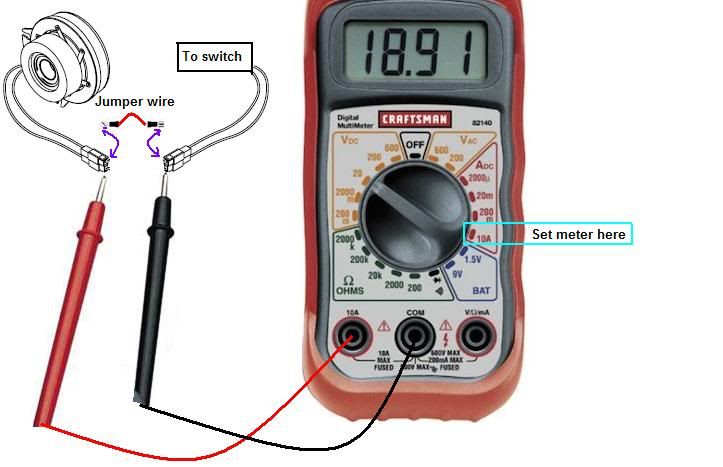
Locating Test Points
First, find the clutch coil terminals. These are metal parts where wires connect. Check your clutch manual for exact terminal locations. Use a flashlight if needed. Clean any dirt or rust on terminals for good contact.
Set your multimeter to the resistance (ohms) mode. Touch the multimeter probes to each terminal. Hold steady to get a clear reading. Avoid touching metal parts with your hands during testing.
Interpreting Resistance Values
Look at the multimeter screen for the resistance number. A normal PTO clutch coil usually shows low resistance. Typical values range from 3 to 10 ohms. A very high number or “OL” means the coil is broken inside.
Zero or near zero resistance means a short circuit. This also means the coil is bad. Compare readings to your clutch’s manual specs. If outside range, replace the clutch coil for safety and function.
Checking Continuity
Checking continuity is a key step in testing a PTO clutch with a multimeter. It helps find breaks or faults in the electrical path. Continuity means electricity can flow without interruption. Without it, the clutch might not work properly.
Using a multimeter to check continuity is simple. The multimeter sends a small current through the circuit. If the circuit is complete, the meter beeps or shows a low resistance value. No beep or a high number means a break or fault.
Testing The Coil Circuit
Start by locating the PTO clutch coil wires. Turn off the power to avoid shocks. Set your multimeter to continuity mode. Touch the probes to the coil terminals. A beep or low reading means the coil is good. No beep means the coil might be damaged or broken inside.
Test both ends of the coil carefully. Sometimes dirt or corrosion causes false results. Clean terminals before testing. Check multiple times to be sure of the reading.
Identifying Faulty Connections
Next, check wiring and connectors for faults. Loose or broken wires cause loss of continuity. Move wires gently while testing to find bad spots. Look for corrosion or dirt at connection points.
Clean or replace damaged wires and connectors. A solid connection ensures the clutch gets full power. Continuity tests help spot these issues fast. Fixing connections can save time and money on repairs.
Measuring Voltage
Measuring voltage is a key step in testing a PTO clutch with a multimeter. It helps check if the clutch receives power and works properly. Accurate voltage readings show whether the electrical system is functioning well. Low or no voltage can mean a problem in the wiring or the clutch itself.
Careful measurement avoids damage and gives clear results. Follow simple steps to connect and read voltage safely. This process is easy with the right tools and knowledge.
Connecting The Multimeter
Start by setting your multimeter to the DC voltage mode. Choose a range that covers 0 to 20 volts for most PTO clutches. Turn off the machine before connecting the probes. Attach the black probe to the negative terminal or ground. Place the red probe on the positive terminal of the clutch wiring.
Make sure the probes touch the metal parts firmly. Avoid loose connections to get steady readings. Turn on the machine after connecting the probes. Watch your hands and tools to stay safe from moving parts.
Assessing Voltage Readings
Look at the multimeter display for voltage values. Normal PTO clutch voltage usually matches the battery voltage, around 12 volts. Readings below this level may indicate weak power supply or bad connections. A zero or very low reading suggests no power reaching the clutch.
Stable voltage confirms the clutch coil is energized properly. Fluctuating or no voltage means check wiring and switches next. Always compare readings with your machine’s manual specifications for accuracy.
Analyzing Test Results
After testing the PTO clutch with a multimeter, you must analyze the results carefully. This step helps you understand the clutch’s condition and decide what to do next. Testing shows electrical resistance and continuity. These numbers tell if the clutch coil is good or damaged.
Check the readings against the clutch’s specifications. A normal reading means the coil is fine. If the reading is very high or shows no continuity, the coil might be broken. Low resistance could indicate a short circuit. These problems affect clutch performance and need attention.
Common Issues And Solutions
One common issue is an open circuit, shown by no continuity on the multimeter. This means the coil wire is broken. The solution is to replace the coil or the entire clutch.
A short circuit appears as very low resistance. This means the coil wires touch each other. Repairing this is difficult. Usually, replacing the clutch is best.
Another problem is inconsistent resistance. This can cause the clutch to engage or disengage poorly. Check the wiring and connectors. Clean or tighten loose parts to fix this.
When To Replace The Clutch
Replace the PTO clutch if the multimeter shows no continuity. This means the coil is broken beyond repair. Also replace it if resistance is too low, signaling a short.
Physical damage or wear on the clutch is another sign to replace it. If cleaning and tightening wiring does not help, the clutch may be faulty. Replacing ensures safe and smooth operation.
Tips For Accurate Testing
Testing a PTO clutch with a multimeter requires care and precision. Accurate results depend on how you prepare and handle your tools. Small errors can lead to wrong readings, wasting time and effort.
Follow these tips to improve your testing process. They help avoid common errors and keep your multimeter working well. Better tests mean safer and more reliable machinery.
Avoiding Common Mistakes
Always turn off power before testing the PTO clutch. Live circuits can damage your multimeter or cause injury. Check the multimeter settings match the measurement type. Using the wrong setting can give false results.
Clean the clutch terminals before testing. Dirt and rust block electrical flow and affect accuracy. Use steady hands and firm contact with the probes. Loose connections cause unstable readings.
Maintaining Your Multimeter
Inspect your multimeter regularly for damage. Cracks or worn wires reduce its performance. Replace old batteries to keep the device reliable. Dead batteries cause weak signals and errors.
Store the multimeter in a dry, cool place. Moisture and heat shorten its life. Calibrate the device as recommended by the manufacturer. Calibration ensures it measures correctly every time.

Credit: www.youtube.com
Frequently Asked Questions
How To Check Pto Clutch Continuity With A Multimeter?
Set your multimeter to the ohms setting. Connect the probes to the PTO clutch terminals. A reading close to zero indicates good continuity. Infinite or no reading means the clutch coil may be faulty or broken.
What Multimeter Setting Is Best For Testing Pto Clutch?
Use the resistance (ohms) setting on your multimeter. This setting measures coil resistance, which is essential to check PTO clutch functionality. Avoid voltage or current settings, as they are not suitable for this test.
Can A Multimeter Detect Pto Clutch Coil Failure?
Yes, a multimeter can detect coil failure by measuring resistance. A very high or infinite resistance suggests a broken coil. A very low reading may indicate a short circuit inside the coil.
How To Interpret Resistance Values Of Pto Clutch Coil?
Typical PTO clutch coils have resistance between 3 to 6 ohms. Readings outside this range may indicate coil damage. Refer to your clutch’s manual for exact specifications to ensure accurate diagnosis.
Conclusion
Testing a PTO clutch with a multimeter is simple and useful. You only need a few steps to check its condition. This test helps find problems early. It saves time and money on repairs. Always use the right tools and follow safety tips.
Practice makes the process easier over time. Keep your equipment working well and avoid breakdowns. Try this test to keep your PTO clutch in good shape.

I’m Asif Ur Rahman Adib, an Electrical Engineer and lecturer. My journey began in the lab, watching students struggle with instruments they used every day without fully understanding them. Over time, I’ve combined teaching, research, and hands-on experience to help others grasp electrical concepts clearly, safely, and practically—whether it’s understanding a circuit or mastering a multimeter.