Is your water heater acting up, leaving you with cold showers? Before calling a technician, you can check if the problem is something simple—like a faulty heating element.
Testing your water heater with a multimeter is easier than you might think. You’ll learn step-by-step how to use your multimeter to find out if your water heater is working properly or needs repair. Keep reading, and you’ll save time, money, and avoid unnecessary hassle.
Tools Needed
Testing a water heater with a multimeter requires the right tools. Having the correct equipment ensures accurate results. It also makes the process safer and faster. This section covers the main tools you need before starting your test.
Choosing The Right Multimeter
Pick a multimeter that measures voltage, resistance, and continuity. Digital multimeters are easier to read than analog ones. Look for a model with clear display and simple controls. Ensure it can test both AC and DC voltage. This type works well for water heater components. Check that it includes probe leads and a protective case.
Additional Supplies
Besides the multimeter, gather a few extra items. You need insulated gloves for safety. A screwdriver helps open the water heater panel. Keep a flashlight handy to see inside dark spaces. A notebook and pen help record test results. Clean cloths or rags are useful to wipe dust or moisture.
Credit: www.plumbersstock.com
Safety Precautions
Testing a water heater with a multimeter requires care and attention. Safety is the top priority before starting any checks. Small mistakes can cause serious injury or damage. Follow these safety steps to protect yourself and your home.
Turning Off Power
Always turn off the power to the water heater first. Locate the circuit breaker and switch it off. Double-check the power is off by using a voltage tester. Never touch electrical parts with power on. This step prevents electric shocks during testing.
Avoiding Electrical Hazards
Wear rubber-soled shoes and avoid wet floors. Use insulated tools to reduce shock risk. Keep your hands dry and do not touch metal parts. Stand on a dry surface while working. These habits keep you safe from electrical hazards.
Preparing The Water Heater
Testing a water heater with a multimeter needs careful preparation. Safety is the top priority. Always turn off the power supply to the water heater. This prevents electric shocks while working.
Drain some water from the tank to avoid leaks and burns. Let the water cool down before touching any parts. This step protects your hands and tools.
Accessing The Heating Element
Locate the heating element on the water heater. It is usually behind a panel or cover. Use a screwdriver to open the panel carefully. This gives you access to the heating element for testing.
Check the area around the element for water or dirt. Clean the space if needed. A clean working area helps avoid mistakes during testing.
Removing Protective Covers
Remove any protective covers over the heating element. These covers keep the element safe but must come off for testing. Use the right tools to avoid damaging the covers.
Keep the screws and covers in a safe place. You will need them to reassemble the heater. Handle the covers gently to prevent cracks or breaks.

Credit: www.youtube.com
Testing The Heating Element
Testing the heating element in a water heater is essential to find out if it works well. The heating element warms the water, so a faulty element means no hot water. This test helps spot broken parts quickly. Use a multimeter to check the element’s condition safely and correctly.
Setting Multimeter To Ohms
Turn on the multimeter. Set it to measure resistance in ohms (Ω). Choose a low range, like 200 ohms, for accurate results. This setting checks if the heating element has the right electrical flow. Make sure the water heater is off and unplugged before testing.
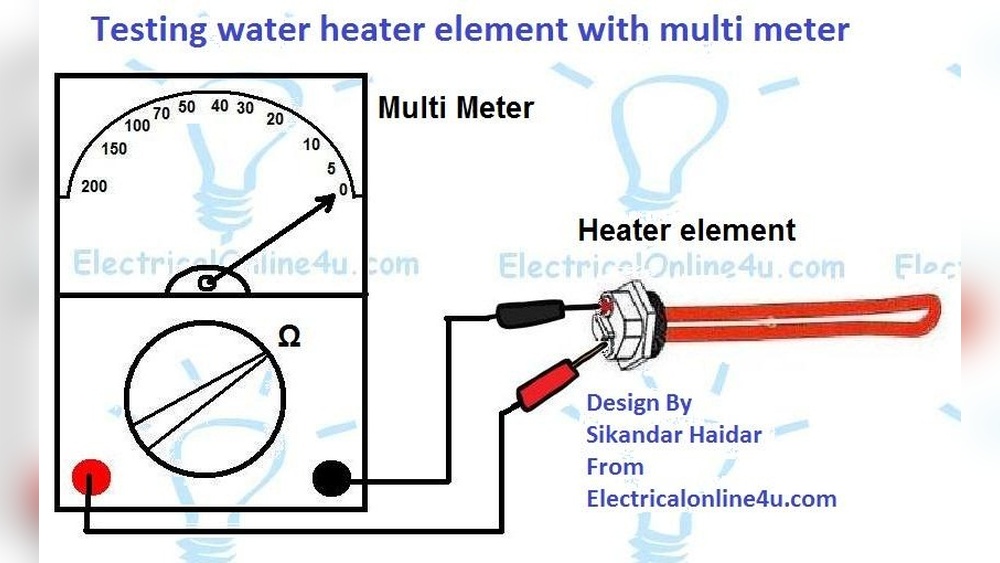
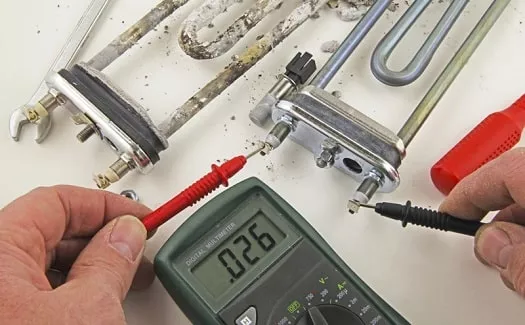
Measuring Resistance
Remove the heating element cover. Disconnect the wires from the element terminals. Place the multimeter probes on each terminal. Hold them steadily to get a clear reading. The multimeter shows the resistance of the heating element. Avoid touching the probes together during this step.
Interpreting Results
A good heating element shows a resistance between 10 and 30 ohms. A reading of zero or very low means a short circuit. A reading of infinite or no change means the element is broken. If the reading is outside the normal range, replace the heating element for proper heating.
Checking The Thermostat
Checking the thermostat is an important step in testing your water heater. The thermostat controls the water temperature by turning the heating element on and off. A faulty thermostat can cause water to be too hot or not hot enough. Testing it with a multimeter helps find problems quickly and safely.
Locating The Thermostat
First, turn off the power to your water heater. Remove the access panel on the side of the heater. You will see one or two thermostat units near the heating elements. Each thermostat is a small box with wires connected to it. Note where each thermostat is before testing.
Testing Continuity
Set your multimeter to the continuity setting or lowest ohms setting. Touch the probes to the thermostat terminals. A beep or low resistance reading means the thermostat has continuity. No beep or infinite resistance means the thermostat is broken. Test each terminal pair to check all parts of the thermostat.
Assessing Functionality
Adjust the thermostat dial to a higher temperature setting. Test for continuity again between terminals. It should close the circuit and show continuity. Turn the dial to a low setting. The circuit should open with no continuity. If the thermostat does not change, it needs replacement.

Credit: www.youtube.com
Identifying Common Issues
Testing a water heater with a multimeter helps find common problems quickly. Knowing what to check saves time and money. Simple electrical tests show if parts work well or need fixing.
Below are typical issues you may find during testing. Understanding these helps to spot faults early. Each problem affects the heater’s performance differently.
High Resistance Readings
High resistance means poor electrical flow. It can cause the heater to work slowly or not heat at all. Use the multimeter to measure resistance on heating elements. A reading higher than the recommended range shows a problem. This often means the element is worn out or damaged.
No Continuity
No continuity means the circuit is broken. The multimeter will not beep or show zero resistance. This happens when wires disconnect or parts fail. No continuity stops electricity from reaching the heating element. Check all connections and replace any broken parts.
Tripped Circuit Breakers
Circuit breakers trip to prevent damage or fire. If your breaker trips often, the water heater may have a short circuit. Use the multimeter to check for shorts between wires or to the metal tank. Find and fix the short before resetting the breaker.
Next Steps After Testing
After testing your water heater with a multimeter, you have important information about its condition. The next steps help you decide what to do. Acting on test results can save you time and money.
Knowing your options helps you fix problems safely and quickly. The test shows if parts work or need replacement. Now, consider repair options or professional help.
Repair Options
If the multimeter shows a faulty heating element or thermostat, replacement is possible. Many parts are easy to buy and install. Turn off power and water before starting repairs. Follow safety steps carefully. Sometimes cleaning or tightening connections fixes issues. Use the test results to target the problem part. Simple repairs can restore your water heater’s function.
When To Call A Professional
Complex problems or unclear test results need expert help. Electrical issues can be dangerous without proper skills. Professionals have tools and knowledge to fix safely. Call a plumber or electrician if you see burnt wires or no voltage. Also, seek help for leaks or strange smells. Timely professional service prevents bigger damage and high repair costs.
Frequently Asked Questions
How Do I Test A Water Heater With A Multimeter?
To test a water heater, first turn off power. Set the multimeter to ohms. Check heating element resistance by measuring terminals. A normal reading ranges from 10 to 30 ohms. No or infinite reading indicates a faulty element.
What Multimeter Setting Is Used For Water Heaters?
Use the resistance (ohms) setting on your multimeter. It measures the heating element’s electrical continuity. Avoid voltage settings for this test to prevent damage and ensure safety.
Can A Multimeter Detect Water Heater Faults?
Yes, it detects faults like broken heating elements or electrical shorts. Low or no resistance readings suggest a problem. This helps diagnose issues without removing parts.
How Safe Is Testing A Water Heater With A Multimeter?
Testing is safe if power is off. Always turn off circuit breakers before testing. Use insulated tools and follow safety guidelines to prevent shocks or injury.
Conclusion
Testing a water heater with a multimeter is simple and safe. Follow the steps carefully to get accurate results. This check helps find problems early and saves repair costs. Always turn off power before testing. Use your multimeter to check heating elements and connections.
Regular tests keep your water heater working well longer. Remember, safety first and take your time. Now, you can test your water heater with confidence.

I’m Asif Ur Rahman Adib, an Electrical Engineer and lecturer. My journey began in the lab, watching students struggle with instruments they used every day without fully understanding them. Over time, I’ve combined teaching, research, and hands-on experience to help others grasp electrical concepts clearly, safely, and practically—whether it’s understanding a circuit or mastering a multimeter.