If you’ve ever needed to check the voltage of a battery, test a wire, or measure electrical resistance, a non-digital multimeter can be your best friend. But if you’re unsure how to use one, it can feel confusing and overwhelming.
What if you could quickly learn the simple steps to confidently handle this tool? In this guide, you’ll discover how to use a non-digital multimeter with ease, making your electrical tasks safer and more efficient. Keep reading, and you’ll gain the skills that many overlook but everyone needs.
Choosing The Right Multimeter
Choosing the right multimeter is key to measuring electrical values accurately. A good multimeter fits your needs and skill level. Picking the correct type helps you work safely and efficiently. Understanding what to look for can save time and frustration.
Types Of Non-digital Multimeters
Non-digital multimeters come mainly in two types: analog and analog-digital hybrids. Analog multimeters use a needle to show readings on a dial. This type helps see trends and changes quickly. Analog-digital hybrids combine needle displays with small digital readouts. They offer more precision but keep the classic look.
Choose an analog multimeter for simple tasks and visual feedback. Pick a hybrid if you want better accuracy but still prefer analog style. Both types measure voltage, current, and resistance effectively.
Key Features To Look For
Check the multimeter’s range settings. It should cover the voltage and current levels you expect to measure. Look for a clear, easy-to-read scale or dial. A good multimeter has a strong build and reliable test leads. Safety ratings like CAT ratings are important for high-voltage work.
Consider extra features like a continuity buzzer or diode test. These help diagnose circuits faster. Choose a multimeter with a comfortable grip and simple controls. These features make your work easier and safer.

Credit: www.wikihow.com
Essential Multimeter Parts
Understanding the essential parts of a non-digital multimeter helps you use it correctly. Each part plays a specific role in measuring electrical values. Knowing these parts makes your testing more accurate and safer.
Display And Dial
The display shows the measurement readings clearly. It usually consists of a needle and a scale. The dial lets you select the type of measurement, like voltage or resistance. Turn the dial to the correct setting before testing. This prevents wrong readings and protects the device.
Probes And Leads
Probes connect the multimeter to the circuit or device. They carry the electrical signals for measurement. Leads are the wires attached to the probes. They must be in good condition for accurate results. Hold the probes firmly during testing to avoid slips.
Battery And Fuse
The battery powers the multimeter. Check it regularly to avoid sudden power loss. The fuse protects the device from electrical overload. It breaks the circuit if the current is too high. Replace a blown fuse before using the multimeter again.
Preparing Your Multimeter
Preparing your multimeter is the first step before taking any measurements. It ensures accurate results and protects the device from damage. Simple checks can save time and avoid mistakes.
Start by inspecting the multimeter carefully. Make sure it is clean and dry. Check the probes and wires for any signs of wear or damage. Proper preparation sets a solid foundation for safe and effective use.
Checking Battery And Fuse
Check the battery level to avoid unexpected power loss. Open the battery compartment and look for corrosion or leaks. Replace old batteries with fresh ones.
Next, inspect the fuse inside the multimeter. A blown fuse can cause wrong readings or no readings at all. Use a small screwdriver to open the fuse holder and check if the wire inside is intact. Replace the fuse if it is broken.
Setting The Correct Measurement Mode
Select the right mode on the dial for your measurement. Multimeters have different modes for voltage, current, and resistance. Choose the mode that matches your task.
Also, pick the correct range if your multimeter has manual range settings. Start with the highest range to prevent damage. Adjust the range down for more accurate readings after the first measurement.
Measuring Voltage
Measuring voltage with a non-digital multimeter helps check electrical power in circuits. Voltage shows the force that pushes electric current through wires. Knowing how to measure voltage helps find problems and verify circuits work safely.
Ac Vs Dc Voltage
Voltage comes in two main types: AC and DC. AC means alternating current. It changes direction many times each second. Household electricity is AC. DC means direct current. It flows in one direction only. Batteries provide DC voltage. Non-digital multimeters often have separate settings for AC and DC. Choose the correct type before testing to get accurate results and avoid damage.
Step-by-step Voltage Testing
First, set the multimeter to the right voltage type: AC or DC. Next, select a voltage range higher than the expected value. Connect the black probe to the COM port on the meter. Place the black probe on the circuit’s ground or negative side. Hold the red probe on the point where you want to measure voltage. Read the scale carefully. The needle points to the voltage level. Remove probes after reading. Turn off the multimeter to save battery. Always be cautious when working with electricity.
Testing Current
Testing current with a non-digital multimeter helps check how much electricity flows in a circuit. It shows if a device uses the right amount of power. Measuring current is different from measuring voltage or resistance. You must connect the multimeter in series with the circuit. This means the current flows through the meter to get the correct reading.
Proper use of the multimeter protects the device and keeps you safe. Follow these tips to test current accurately and avoid damage.
Safety Precautions
Always turn off power before connecting the meter. Use the right settings on the multimeter. Start with the highest current range to avoid blowing the fuse. Do not touch metal parts of the probes during testing. Use insulated tools and wear safety gloves if needed. Never test current on a damaged wire or circuit. Check that the multimeter’s fuse is working before use. Keep your hands dry and stand on a dry surface to reduce shock risk.
Measuring Current Properly
Switch the multimeter to the current measurement mode, often marked as “A” or “mA.” Connect the red probe to the positive side and the black probe to the negative side. Break the circuit where you want to measure the current. Insert the probes so the current flows through the meter. Read the value on the dial or scale carefully. If the reading is zero, check your connections. If the meter shows overload, change to a higher current range. After measuring, turn off the meter and circuit before removing probes.
Checking Resistance
Checking resistance with a non-digital multimeter helps find breaks or problems in wires and devices. Resistance measures how much a material stops electric current from flowing. This test ensures circuits work properly and safely. Knowing how to check resistance can save time and money on repairs.
When To Test Resistance
Test resistance to find broken wires or parts that do not work. Use it when a device does not turn on or acts strange. Check resistors in circuits to make sure they have the right resistance. Also, test switches and fuses for damage. Resistance testing helps see if parts connect well or need replacing.
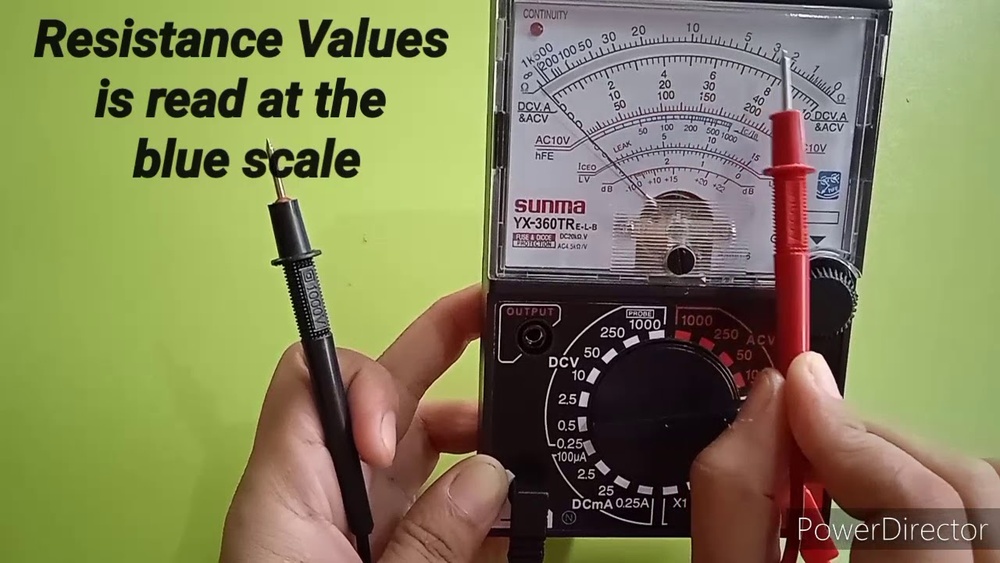
Using The Multimeter For Resistance
First, turn the multimeter’s dial to the resistance setting, often marked with the omega symbol (Ω). Touch the probes together to see a zero reading. This checks the meter works. Next, place the probes on each end of the part you want to test. Read the number on the scale. A low number means good connection. A very high or infinite number means a break or no connection. Always test with the power off to avoid damage.
Continuity Testing
Continuity testing is a simple way to check if an electrical path is complete. It helps find broken wires or poor connections. Using a non-digital multimeter for this test is easy and reliable. This test ensures current can flow through a circuit.
Continuity testing saves time and prevents damage in electrical work. It shows if circuits or components are connected or open. Understanding how to do this test is useful for both beginners and experts.
Purpose Of Continuity Test
The main goal is to check if a circuit is closed. A closed circuit allows electricity to flow freely. If the circuit is broken, the multimeter will show no continuity. This test helps find faults in wires, switches, and fuses.
It ensures safety by detecting open circuits before powering devices. Continuity testing also confirms repairs and installations are done right. It is a quick way to verify electrical paths.
How To Perform Continuity Checks
First, turn off power to the circuit you will test. Set the multimeter to the continuity mode, often marked with a sound wave symbol. Touch the two test probes together to check if the multimeter beeps. This beep means the meter works correctly.
Next, place one probe on each end of the wire or component. If the multimeter beeps, the path is complete. No beep means the circuit is broken or has high resistance. Move probes to different points to locate the exact break.
Always handle the probes carefully to avoid false readings. Use continuity testing before fixing or replacing parts. It helps you find problems faster and work safely.

Credit: www.instrumentationtoolbox.com
Common Mistakes To Avoid
Using a non-digital multimeter can be tricky at first. Mistakes can cause wrong readings or damage the tool. Knowing common errors helps you avoid trouble and get accurate results. Here are key mistakes many users make.
Incorrect Settings
Setting the multimeter wrong leads to bad readings. Always check the dial before testing. Choose the right measurement type: voltage, current, or resistance. Pick the correct range to avoid overloading the meter. Using a high range for small values reduces accuracy. A low range on high values can harm the multimeter.
Probe Handling Errors
Holding probes incorrectly causes false readings or shocks. Never touch the metal tips with your fingers. Keep your hands behind the probe guards. Connect the probes firmly to the test points. Loose contact can make the meter jump or show zero. Avoid letting probes touch each other during tests to prevent short circuits.
Safety Tips For Beginners
Safety is the top priority when using a non-digital multimeter. Beginners must take careful steps to avoid accidents. Understanding basic safety tips helps prevent injuries and damage. Follow simple rules to work safely and confidently with your multimeter.
Protective Gear
Always wear protective gear before starting your work. Safety glasses protect your eyes from sparks and debris. Insulated gloves reduce the risk of electric shock. Use shoes with rubber soles to avoid grounding yourself. Dress in clothes that cover your skin fully. These small steps help keep you safe.
Working With High Voltage
High voltage is very dangerous and requires extra caution. Never touch exposed wires or terminals directly. Use one hand only to avoid creating a path for electricity. Stand on an insulated surface like a rubber mat. Check your multimeter’s rating to ensure it can handle high voltage. Turn off power before connecting the meter if possible. Always be alert and focused when measuring high voltage.

Credit: www.youtube.com
Frequently Asked Questions
What Is A Non Digital Multimeter Used For?
A non digital multimeter measures voltage, current, and resistance in electrical circuits. It helps diagnose electrical problems accurately and safely.
How Do You Read A Non Digital Multimeter?
Read the needle position on the analog scale. The pointer aligns with the measured value on the dial.
How To Set A Non Digital Multimeter For Voltage?
Turn the dial to the voltage range above the expected voltage. Connect probes correctly before measuring.
Can Non Digital Multimeters Measure Ac And Dc?
Yes, non digital multimeters can measure both AC and DC voltage and current with proper settings.
Conclusion
Using a non-digital multimeter is simple with practice and care. Always check the device settings before testing. Stay safe by handling wires and components carefully. This tool helps you find electrical problems quickly. Regular use builds your confidence and skill.
Remember to store the multimeter properly after use. Keep these tips in mind to test circuits easily and safely. Your hands-on experience grows with each measurement taken.

I’m Asif Ur Rahman Adib, an Electrical Engineer and lecturer. My journey began in the lab, watching students struggle with instruments they used every day without fully understanding them. Over time, I’ve combined teaching, research, and hands-on experience to help others grasp electrical concepts clearly, safely, and practically—whether it’s understanding a circuit or mastering a multimeter.